The most beautiful gardens you see on Pinterest almost always have one thing in common: a DIY wooden trellis that does more than hold up plants — it gives the entire outdoor space a sense of structure, intention, and personality. If you’ve been scrolling through garden inspiration and wondering how to get that same layered, lived-in look without hiring a landscaper, this post will show you exactly which trellis styles actually work in real American yards, how to build them without a professional woodworking background, and which design details separate the pins that get saved thousands of times from the ones that get scrolled past.
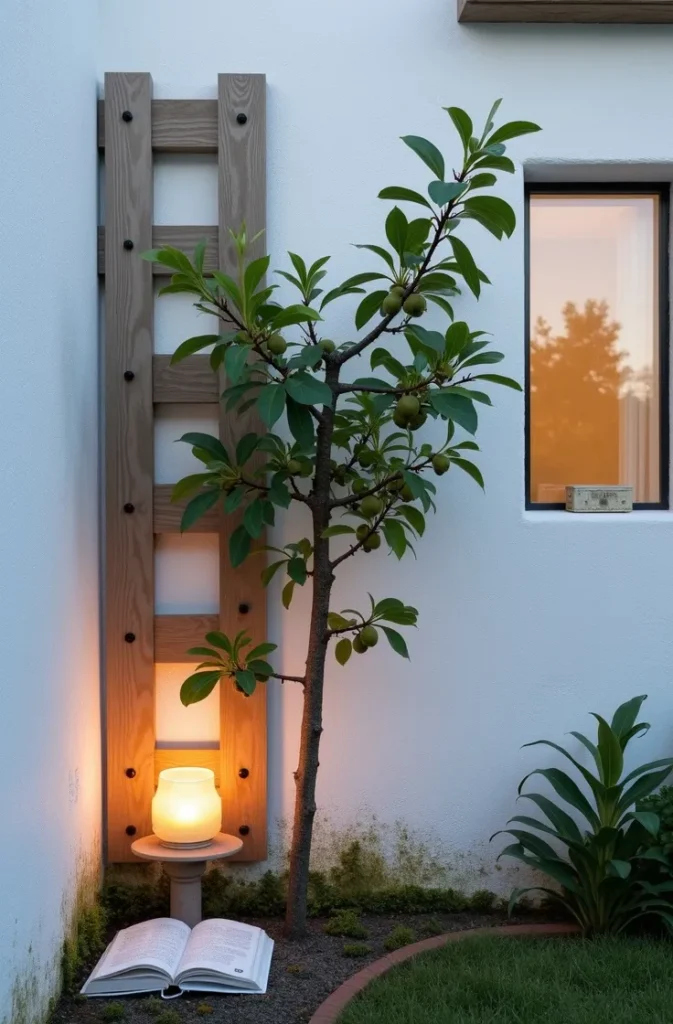
The Lean-Against-the-Fence Ladder Trellis That Takes One Afternoon and Elevates an Entire Fence Line
Most people overthink their first trellis build. The ladder-style trellis — two vertical rails with evenly spaced horizontal rungs — is the single most versatile starting point for any garden wall or fence section, and it can be built in three to four hours with cedar 1x2s and basic hardware. What makes this design work so well against a fence is the negative space: the open grid creates shadow patterns that shift throughout the day, giving a plain fence panel a kind of quiet, sculptural presence even before a single vine grows through it.
This design is ideal for renters and homeowners in narrow side yards, urban row house gardens, and California bungalow-style backyards where fence lines dominate the space. A 6-foot-tall by 2-foot-wide ladder trellis leans at a slight angle against the fence, eliminating the need for post holes or concrete. That means you can reposition it seasonally, which gardeners in colder Midwest climates especially appreciate.
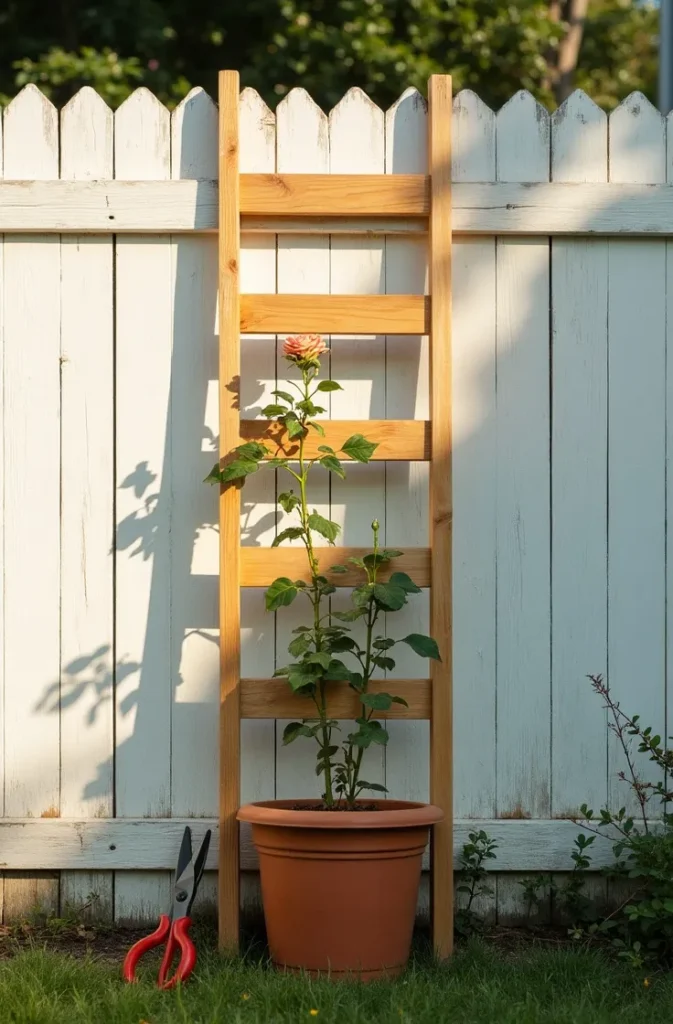

The mistake most first-time builders make is using pressure-treated pine without sealing the ends — within one growing season, the wood splits at the horizontal joints and the whole structure starts to feel cheap. Cedar or redwood is worth the price difference. Finish with a simple raw linseed oil coat rather than paint if you want that warm, natural look that photographs so well.
Picture a lean-against trellis against a weathered white fence in late afternoon, with a small climbing rose just beginning to thread through the lower rungs. That could be your yard by next weekend.
Why a Diamond-Grid Trellis Panel Belongs on Every Blank Garden Wall You Own
The diamond-grid pattern — sometimes called a lattice or argyle trellis — is one of the oldest trellis designs in American garden history, and it earns that longevity because the geometry genuinely works. The diagonal lines of a diamond grid draw the eye upward more effectively than a square grid does, which makes it the smartest choice when you’re working with a low garden wall, a basement window well, or a squat garage exterior that needs visual height.
Building a diamond grid from scratch sounds complicated, but the practical method is to take two sets of parallel 1×1 cedar strips and layer them at 45-degree angles, stapling or screwing them at each intersection. A 4×6-foot panel built this way weighs almost nothing and can be mounted to masonry walls with simple anchor bolts — a technique common in New York City brownstone backyards and Chicago courtyard gardens where brick walls need softening without permanent structural changes.
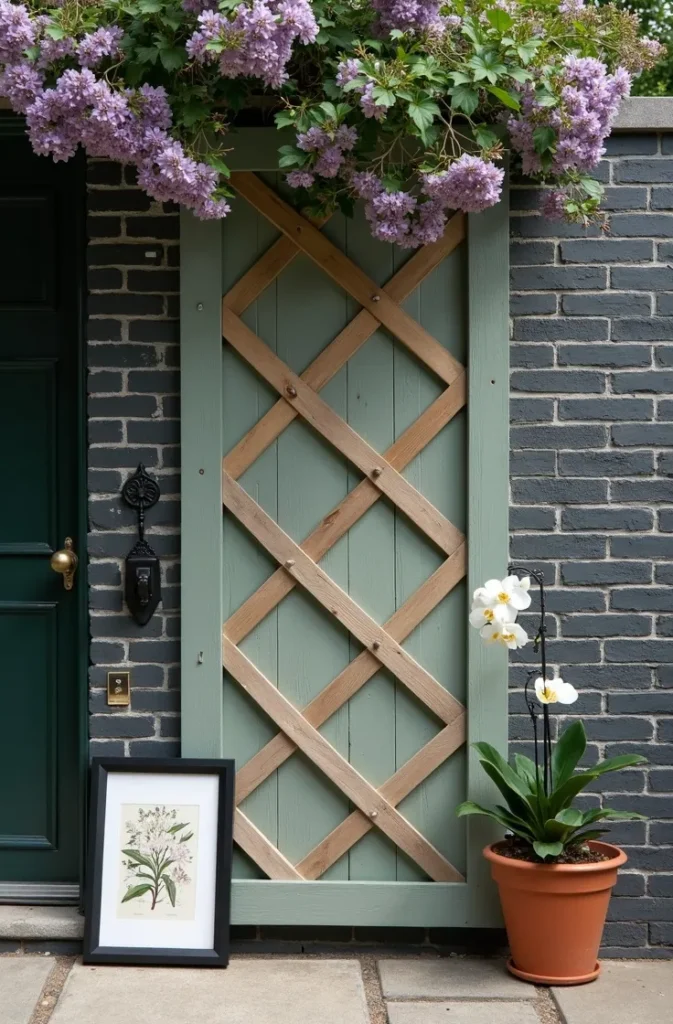
For a diy wooden trellis 2025 project that looks genuinely elevated, paint the finished diamond panel in a matte deep green or dusty blue before mounting it. The color reads as intentional design rather than a home improvement project, and flowering vines against a painted ground photograph in an entirely different league.
Avoid using prefab plastic lattice panels and calling it done — the thin white plastic flexes, warps in summer heat, and signals “temporary fix” to anyone who looks at it. The handbuilt wood version takes two extra hours and looks like it belongs there.
The Freestanding A-Frame Trellis That Works in the Middle of a Garden Bed — No Wall Required
Not every garden has a wall or fence in the right place. A freestanding A-frame trellis — two trellis panels joined at the top ridge with a hinge or a fixed angle — solves the layout problem of open garden beds that need structure without a hard surface to lean on. The A-frame is self-supporting and acts as a kind of garden room divider, separating a vegetable patch from a seating area or breaking up a long narrow garden into distinct zones.
The most practical build uses two 4×6-foot cedar grid panels connected at the top with a piano hinge so the whole structure can fold flat for winter storage. This is particularly valuable in Texas and Oklahoma gardens where summer annuals like morning glories or black-eyed Susan vines cover the structure beautifully, then the frame comes down cleanly before the first freeze.
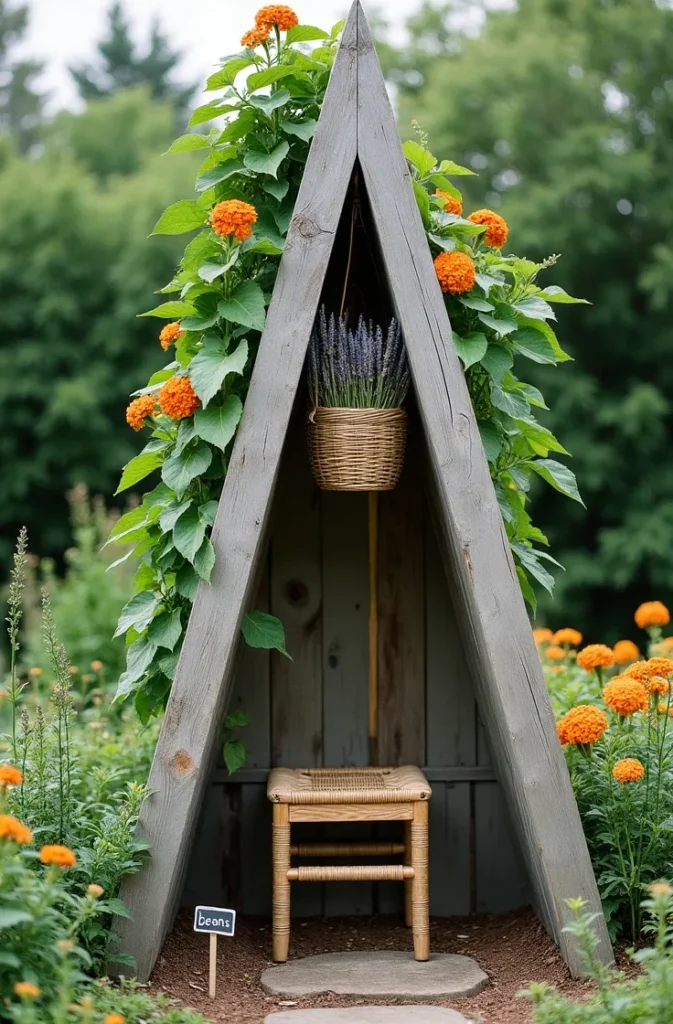
For small backyard layouts, position the A-frame at the back third of your garden bed rather than the center — it creates more visual depth and gives climbing plants the full vertical surface they need to perform. Pair it with a simple bench on the inside and you’ve built a private garden alcove that becomes the most photographed corner of your yard.
What doesn’t work: building the frame with wood thinner than 1.5 inches and expecting it to hold up through a full growing season with heavy squash or cucumber vines. Go thicker than you think you need.
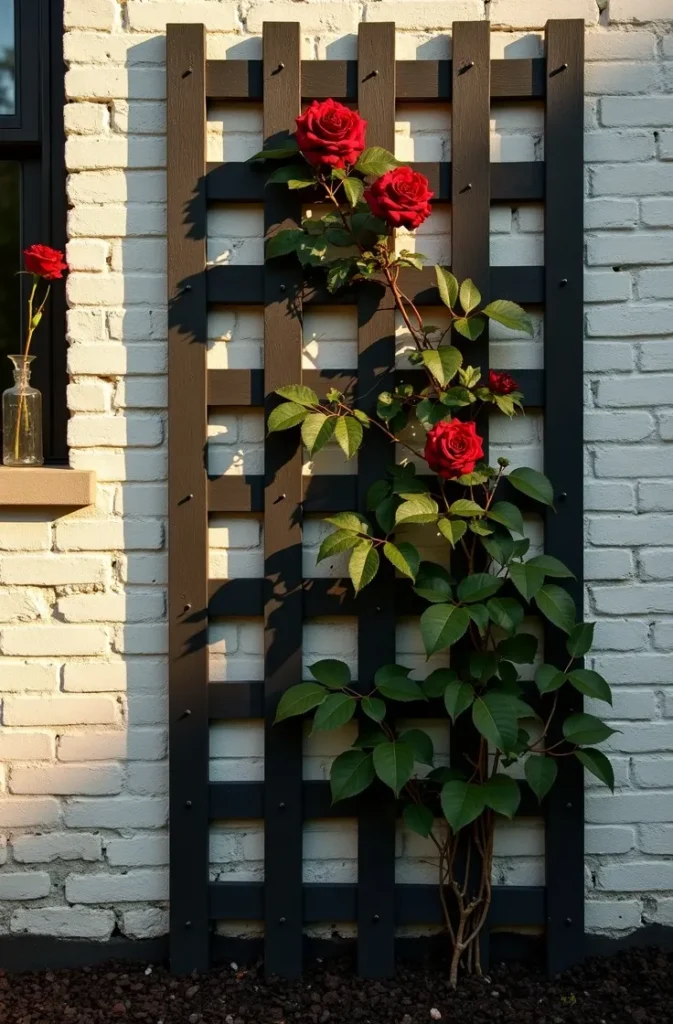
How to Build a Cedar Arch Trellis That Makes a Garden Gate Feel Like a Design Decision
A garden arch is the single most impactful structural element you can add to a residential garden — and the good news is that a cedar arch trellis is well within a beginner’s skill level when you use a laminated bending technique rather than trying to steam-bend solid lumber. Two parallel upright posts on either side of a path, connected at the top by a curved rail made from laminated thin strips of cedar bent over a simple form, creates an arch that looks handcrafted and professional.
This style of diy wooden trellis works especially well over a garden gate entrance, a path transition between lawn and bed, or at the entrance to a vegetable garden in a classic American kitchen garden layout. The arch signals arrival — it tells anyone entering the garden that what follows is intentional. In practical terms, a 7-foot-tall arch needs posts sunk 2 feet into the ground for stability, which means concrete footings are worth doing right the first time.
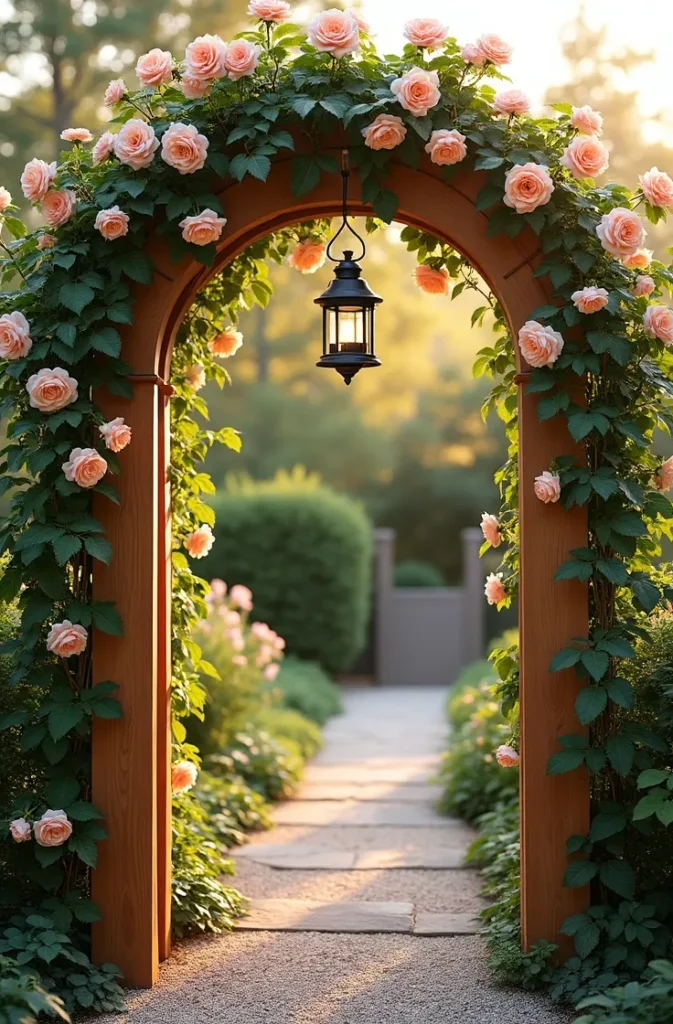
The visual detail that elevates a cedar arch from a weekend project to a genuine garden feature is the grid panel that fills the upper third of each upright. A simple 6-inch square lattice panel on either side of the arch gives climbing roses, jasmine, or wisteria a surface to cling to from the base upward, drawing the eye to the arch before you even pass through it.
Mistake to avoid: building the arch posts too close together. Anything under 36 inches of clear width feels cramped and looks awkward when photographed. Standard garden arch width is 42 to 48 inches.
The Wall-Mounted Fan Trellis That Gives a Single Climbing Plant the Space to Become Architecture
The fan trellis — a series of wooden rails radiating outward from a single anchor point like a spread hand — is one of the most underused DIY trellis ideas in American residential gardens, and it is genuinely one of the most beautiful. When a climbing plant grows along the fan shape, it mimics the natural pattern of how branches radiate from a trunk, and the result looks less like a garden feature and more like a piece of outdoor sculpture.
A cedar fan trellis built from seven 1×2 rails of graduated lengths (from about 18 inches at the outer edges to 48 inches at the center) takes about an afternoon to build and can be wall-mounted with two simple lag bolts. This is the right trellis for a single focal-point wall: the back of a garage, the side of a garden shed, or a chimney breast exterior that needs softening. In California garden design — especially the Spanish colonial and craftsman bungalow aesthetic — fan trellises appear frequently against stucco walls because they add structure without competing with the architecture.
For maximum design impact, let only one plant grow on a fan trellis and train it deliberately along each rail. An espalier-trained apple tree on a fan trellis in a small Texas or Arizona backyard is one of the most space-efficient and visually striking gardening projects you can attempt.
Do not over-finish this trellis. The raw cedar, allowed to silver naturally over the first year, develops a tone that looks intentional and aged in a way that polyurethane-sealed wood never does.
Why a Horizontal Rail Trellis on a Privacy Fence Does What Vertical Boards Never Could
When a standard wooden privacy fence needs to do double duty — blocking sightlines and supporting plants — most people add a vertical lattice panel on top and call it done. The horizontal rail trellis is a better answer. A series of evenly spaced horizontal cedar rails mounted 4 to 6 inches off the face of an existing fence creates a growing surface that plants can twine through naturally, while also producing a strong linear pattern that reads as modern and intentional rather than “I needed more privacy.”
This design is the right choice for any fence that separates a patio from a neighbor’s yard in a suburban Midwest or Southern US home — it gives you a lush green screen in a single growing season with fast-growing jasmine or climbing hydrangea, while the wooden rail pattern remains visible through the foliage and adds texture to the view from indoors.
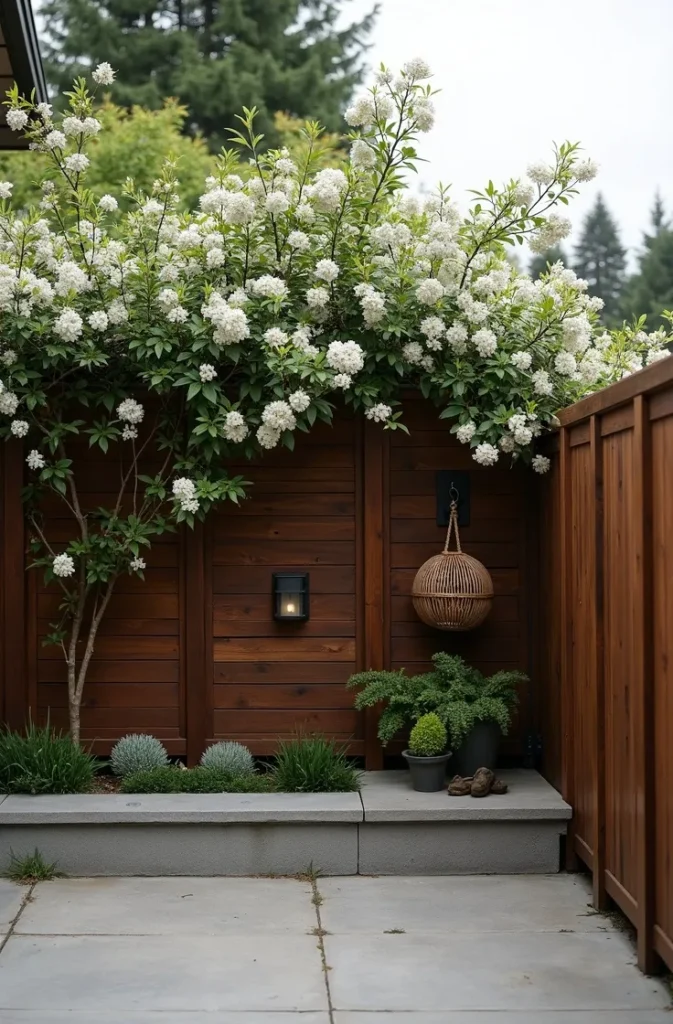
Building it is simple: mount 1×2 horizontal cedar rails directly to the fence face using spacer blocks every 4 feet to hold the rails 4 inches proud of the fence surface. That gap is what allows air circulation behind the plants and prevents the rot that plagues trellises mounted flush to wooden fences.
The spacing matters more than most tutorials admit. Spacing rails 6 inches apart works for light annual vines. For heavier perennial climbers like climbing hydrangea or wisteria, space at 8 to 10 inches to give mature stems room to thicken.
The Modular Grid Trellis System That Lets You Expand Your Garden Structure One Panel at a Time
One of the most practical diy wooden trellis approaches for gardeners who are not ready to commit to a permanent structure is a modular panel system — individual square trellis panels built to a consistent size (typically 2×4 feet) that can be connected side by side or stacked vertically as the garden grows. Each panel is a simple square frame with an interior grid of 2-inch squares built from cedar 3/4-inch dowels. The panels join together with recessed bolt connectors so the finished wall looks seamless.
This approach is ideal for renters or homeowners in the process of redesigning their garden layout, because the entire system can be disassembled and reconfigured in an afternoon. A four-panel run creates an 8-foot-wide growing wall. Six panels stacked two-high create a privacy screen. The flexibility is the point.
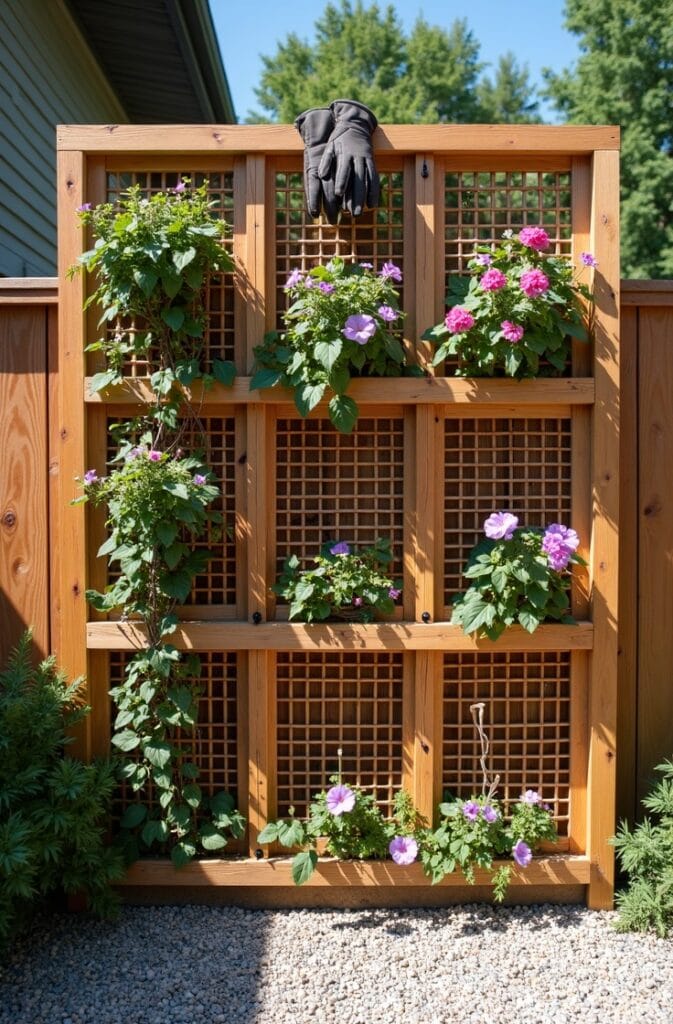
In terms of material, using 3/4-inch cedar dowels for the interior grid gives you a finer, more delicate look than the typical 1×2 lumber grid — the pattern reads more like woven textile than construction material, which is why this style tends to perform so well as a Pinterest-optimized garden feature.
The honest caveat: this system requires precise cuts. Every panel must be built to the same dimensions or the connectors will not align. Invest in a miter saw or have your lumber yard make the cuts before you build.
How a Painted Black Wooden Trellis Changes the Entire Mood of a Garden in One Weekend
Color is the most underestimated variable in wooden trellis design. A natural cedar trellis is warm and organic. A white-painted trellis reads as classic and cottage. But a trellis painted in flat or satin black — whether it is a simple grid, a fan, or a lattice panel — shifts a garden into a completely different register: modern, dramatic, and high contrast in a way that makes every plant color more saturated by comparison.
The black trellis has been a staple of Japanese-influenced garden design for decades, and it has recently become one of the most-pinned garden aesthetics in the USA because of the way it performs visually against light-colored stucco, whitewashed brick, or a pale grey privacy fence. The dark grid recedes visually and makes the plants — not the structure — the subject of the frame.
Build the trellis from any dimensional cedar stock, sand it smooth, prime it with a shellac-based primer (critical for outdoor wood that will be painted), and apply two coats of exterior satin black. The finish reads as intentional and architectural rather than DIY within a single growing season of coverage.
This works best with bold-color flowering climbers — a deep red climbing rose against black wood creates the kind of photograph that collects thousands of saves. White or cream flowers work equally well for a different mood.
What does not work: gloss black. It shows every imperfection, reflects harsh light, and photographs with unwanted glare. Satin is the correct finish, every time.
The Planter Box and Trellis Combo That Works on Any Patio, Balcony, or Deck
Combining a raised planter box with a built-in trellis back panel solves one of the most common problems in American patio gardening: how to grow climbing plants in a space with no ground and no wall in the right position. A freestanding cedar planter box — 24 inches long, 12 inches wide, 18 inches tall — with a 4-foot-tall trellis panel built into the back rail is fully self-contained. The plants root into the box, climb the panel, and the entire unit can be moved.
This is the design that works for apartment balconies in Seattle or Boston, rooftop terraces in Chicago, and small deck spaces in any Southern US city where ground planting is not possible. It is also one of the most genuinely useful DIY wooden trellis ideas for anyone who wants to start growing climbing flowers or vegetables without committing to an in-ground installation.
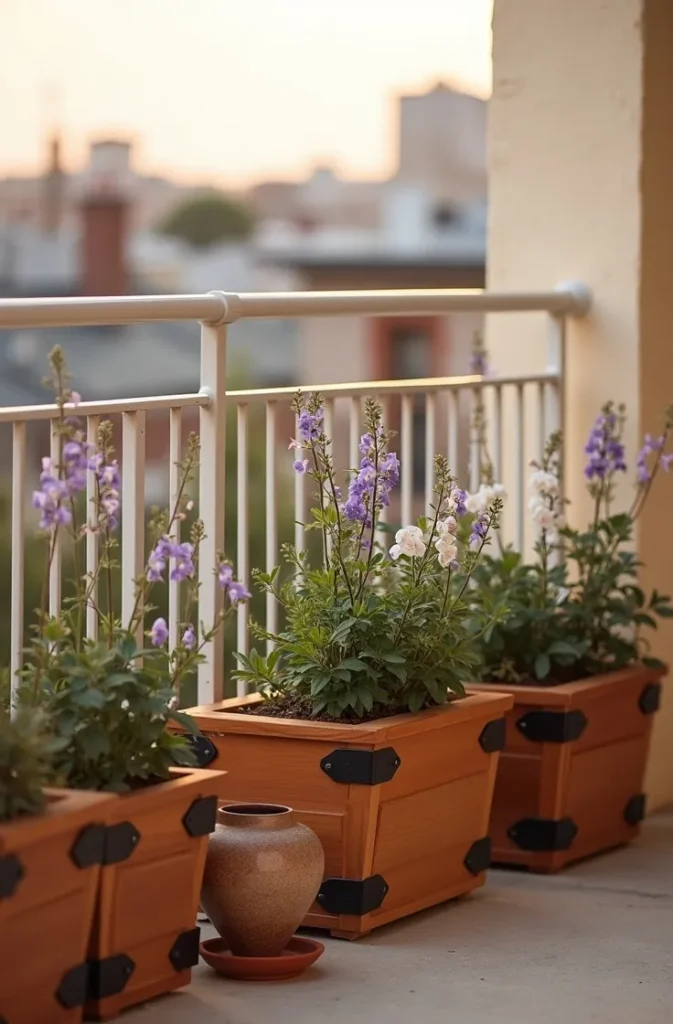
Build the planter box from 1.5-inch cedar boards with a simple butt-joint construction and stainless steel screws. Line the interior with landscape fabric before filling with soil to protect the wood from moisture. The trellis back panel slots into two vertical posts that are lag-bolted to the back of the planter box — no separate footings required.
For visual cohesion on a balcony, build two or three of these units in a row at consistent spacing. A run of three planter-trellis units against a balcony railing covered in climbing sweet peas or mandevilla is one of the most beautiful small-space garden solutions in residential design.
The Chevron-Pattern Trellis That Most Garden Centers Would Charge You $400 For
The chevron trellis is the design-forward option that most gardeners assume requires a professional to build. It does not. A chevron pattern — V-shaped rows of angled rails — is built by setting cedar 1×2 strips at consistent 45-degree angles in alternating directions across a rectangular frame. The result is a bold zigzag grid that reads as modern, graphic, and intentional in a way that a standard square grid never quite achieves.
This is the right trellis design for a contemporary or transitional home aesthetic — the clean-lined suburban homes that are common in newer developments across Arizona, Colorado, and the Pacific Northwest. Against a modern home exterior of cement board or horizontal metal siding, a chevron cedar trellis in a natural finish is a genuine exterior design moment.
![]()
The build requires a miter saw set at 45 degrees and a consistent spacing jig to keep each angled rail uniform. The frame is built first — a rectangle of 2×2 cedar — then the interior rails are cut and set. Plan for the angled rails to be spaced 4 inches on center for a fine, detailed pattern or 8 inches on center for a bolder, more graphic look.
For plants, choose climbers with fine foliage — clematis, passion vine, or climbing snapdragons — that allow the geometric pattern of the wood to remain visible through the growing season. The whole point of this trellis is the pattern. Do not bury it.
The Trellis That Earns Its Place in Every Garden Season
You now have ten trellis designs that go well beyond weekend inspiration — each one designed to solve a specific problem, fit a specific space, and produce a result that looks like it cost far more than it did. Save this post before you start shopping for lumber so you can come back to the exact dimensions, material notes, and design details when you are ready to build. Whether you are starting with a simple lean-against ladder trellis or committing to a full chevron feature panel, the right DIY wooden trellis will change the way your garden reads — from the street, from your kitchen window, and in every photograph you take of it. This is the kind of project that pays back in beauty every single season.