The best low cost wood ceiling ideas are hiding in plain sight at every lumber yard and salvage shop in the country — and yet most homeowners walk right past them because nobody has shown them how to see what they actually are. If you have a plain white ceiling that is doing nothing for the room below it, the ideas in this post will show you exactly which wood ceiling treatment fits your space, your skill level, and your budget — and why each one works architecturally, not just aesthetically. By the time you reach the end, you will have a specific plan, not just a Pinterest board.
The Shiplap Ceiling Trick That Makes a Low Ceiling Feel Taller Without Removing a Single Joist
Shiplap installed horizontally on a ceiling does the opposite of what most people expect: instead of drawing the eye down, it draws it across the length of the room, which visually stretches the ceiling plane and makes a low eight-foot ceiling read as taller than it is. The horizontal lines create a directional pull that the brain interprets as width and depth rather than height restriction.
The mechanics are simple. Standard shiplap boards — 1-by-6 or 1-by-8 pine with a rabbet cut on each edge — nail directly to the ceiling joists with a small reveal gap between each board. The reveal, typically an eighth of an inch, creates the shadow line that defines each board and gives the ceiling its graphic quality. Without the reveal, shiplap reads as drywall with seams, which is not the same thing.
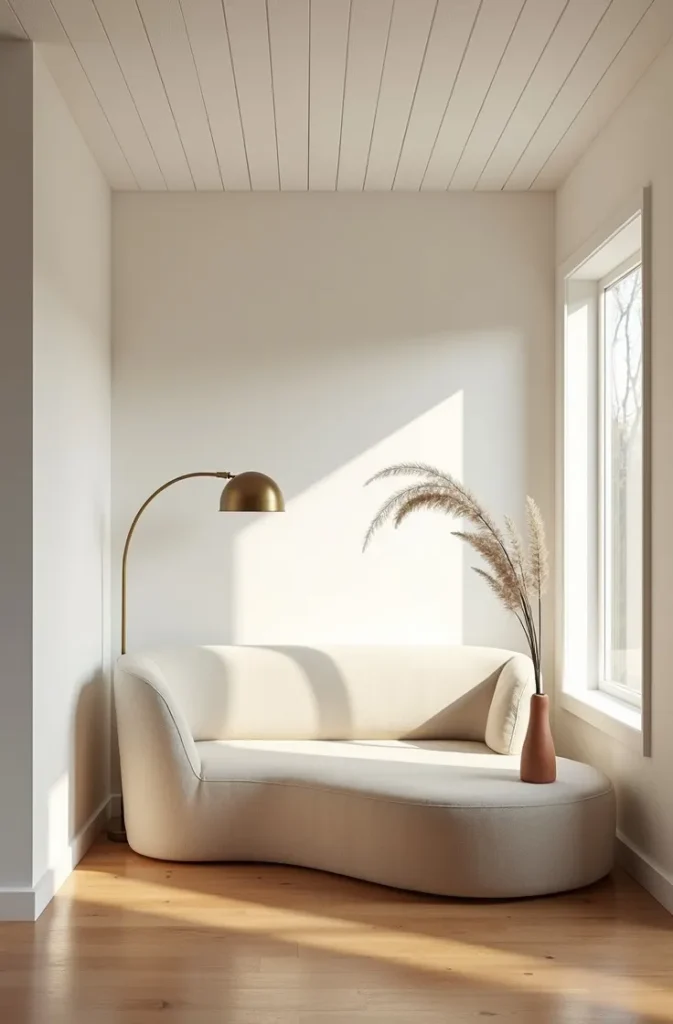

For cost, this is one of the most accessible wood ceiling options available. Primed pine shiplap boards run significantly less per square foot than tongue-and-groove or beadboard, and in many areas of the Southeast and Midwest, unfinished pine at the lumber yard can be cut to length for even less. Women renovating starter homes in Texas, Tennessee, and the Carolinas have been using this approach on living rooms and master bedrooms for exactly that reason — the material cost is low and the visual return is disproportionately high.
The mistake that turns this from beautiful to builder-grade: using boards that are too wide for the ceiling height. In a room with eight-foot ceilings, boards wider than six inches look heavy and push the ceiling down rather than lifting it. Keep the board width proportional to the ceiling height, and the shiplap ceiling will photograph beautifully from every angle.
Why Pine Tongue-and-Groove Is the Low Cost Wood Ceiling Choice That Looks Like a Custom Build
Tongue-and-groove pine ceiling boards are the material that architects specify on cabin retreats, coastal cottages, and mountain homes across the country — and they cost a fraction of what most people assume. At most lumber yards, unfinished pine tongue-and-groove boards in a standard 3.5-inch face width are among the least expensive dimensional lumber available, and they install faster than shiplap because the interlocking profile eliminates the need for spacing and reveal maintenance during installation.
The ceiling profile created by tongue-and-groove is tighter and more refined than shiplap — no shadow line, just a continuous plane of boards with a subtle V-groove where each joint meets. This gives the ceiling a finished, architectural quality that reads as intentional and custom rather than trend-driven. It is the ceiling detail that people notice in a room and cannot quite name — which is the best kind of design.

In beach houses along the Carolina coast, lake cabins in the Midwest, and mountain properties in Colorado and Virginia, tongue-and-groove pine ceiling is the standard interior finish precisely because it performs so well in spaces where humidity and temperature fluctuate seasonally. Pine moves less than hardwoods in response to moisture changes, and the tongue-and-groove connection accommodates that movement without cracking or gapping.
What not to do: leave it unfinished and expect it to age gracefully in a climate with humidity swings. Unfinished pine in a bathroom addition or a screened porch in the Southeast will gray and blotch unevenly within two seasons. A clear penetrating oil finish or a light white wash — not a heavy paint — protects the wood while keeping the grain visible and the room feeling honest.
The Stained Plywood Ceiling That Looks Like Expensive Hardwood for One Third of the Price
Plywood ceiling panels are the most underestimated low cost wood ceiling material in residential construction, and the reason is almost entirely about perception. People hear “plywood” and picture the rough, unfinished sheets stacked at a construction site. What they do not picture is sanded, stained Baltic birch or cabinet-grade maple plywood, installed in clean horizontal panels with tight seams and a matte finish — which is a completely different object.
The approach is straightforward: half-inch or three-quarter-inch cabinet-grade plywood, cut to consistent panel widths of 24 or 32 inches, installed perpendicular to the ceiling joists with a visible seam at each joint. The seam is either left as a shadow line, covered with a thin wood batten strip, or filled and finished. Of the three options, the batten-covered seam is the most intentional-looking and the most forgiving for a first-time installer because the batten conceals any minor alignment imperfections.
The finishing step is where cost control and visual impact intersect. A warm walnut stain applied to birch plywood reads from ten feet away as genuine walnut ceiling planks — a material that, installed as solid wood, would cost four to six times as much per square foot. Women doing ambitious budget renovations in Chicago loft apartments, Denver bungalows, and New York rental spaces have used this approach on studio ceilings specifically because the transformation photographs in a way that looks entirely custom.
The critical installation detail that most guides skip: seal both faces of the plywood panel before installation, not just the visible face. Sealing only one face allows the panel to cup toward the unfinished side as humidity changes, and a cupped panel ceiling is the one result that cannot be fixed without reinstalling. Two minutes per panel with a brush and clear sealer saves an entire reinstallation.
The Whitewashed Beam Look That Costs Less Than $200 and Changes the Entire Architecture of a Room
Faux ceiling beams — hollow box beams built from three pieces of 1-by-6 or 1-by-8 pine, assembled into a U-channel and mounted to the ceiling — are the single highest-impact low cost wood ceiling treatment available for living rooms and bedrooms with eight-foot or taller ceilings. A set of three beams running the length of a standard living room can be built, painted or stained, and installed in a single weekend for well under $200 in materials.
The visual function of ceiling beams is architectural weight. They lower the perceived ceiling height in the best way — not by making it feel cramped, but by making it feel bounded and intimate, the way a tray ceiling or a coffered ceiling does in a more expensive renovation. Beams create the horizontal rhythm that makes a room feel designed at the ceiling level rather than just painted.

Whitewashing the pine before assembly is the finish choice that works best in almost every residential context because it reads as both rustic and modern simultaneously. A diluted white paint wash — roughly 50 percent paint to 50 percent water, brushed on and wiped back — allows the wood grain to show through while softening the rawness of new pine. The result is a beam that looks like it has been there for fifty years without looking dingy.
This treatment works on almost any ceiling type and is the right call for Midwest ranch homes, Texas farmhouse renovations, and any space where the goal is warmth and character rather than sleek minimalism. The one context where it falls flat: rooms with less than eight-foot ceilings. Below that threshold, ceiling beams make the room feel compressed rather than intimate. Save this for rooms with a little height to work with.
The Beadboard Ceiling That Brings Cottage Character to Any Room Without a Single Contractor
Beadboard is the ceiling treatment that has been used in American homes since the Victorian era — and it is still one of the best low cost wood ceiling options available because it installs without specialized tools, is sold in panel form at every major home center, and adds a level of architectural character that no amount of paint on bare drywall can replicate.
The material comes in two forms: individual tongue-and-groove boards about an inch and a half wide, which install like traditional wood flooring on the ceiling and take more time, or four-by-eight sheet panels with a routed bead pattern that installs as a single piece per section and takes an afternoon. For a cost-focused renovation, the sheet panel version is the correct choice — less labor, less waste, and near-identical visual result from normal viewing distance.
Beadboard reads as cottage, coastal, or classic depending on the color it is finished in. Painted a warm cream or a pure white, it belongs on a covered porch, a sunroom, or a bedroom in a Cape Cod-style home on the New England coast. Painted a soft sage or a dusty blue, it reads as coastal farmhouse — the aesthetic that dominates interior design in Coastal Carolina and the Florida Gulf towns. Left in a clear-finished natural wood, it belongs in a cabin or a craftsman bungalow where the warmth of wood is the point.
The one installation detail that matters most: prime and paint the beadboard before installation, not after. Getting paint into the grooves after the panels are nailed to the ceiling requires a small brush and patience that the job does not deserve. Spray the panels flat on sawhorses, let them dry, and install them already finished. Touch-up the nail holes and seams after — the work is minimal and the result is clean.
How a Reclaimed Wood Ceiling Accent Panel Costs Almost Nothing and Reads as a $10,000 Renovation
Reclaimed wood accent ceiling panels — a single section of the ceiling treated with salvage barn wood, weathered fence boards, or pallets — are the budget treatment that photographs as a full renovation when done in the right location. The key is placement: directly above the dining table, above the bed in a master bedroom, or centered above the kitchen island. The accent panel works because it targets the one ceiling zone where the eye spends the most time and where visual interest matters most.
The material cost for reclaimed wood ceiling panels can be close to zero in rural or suburban areas where barn wood is available from demolition sites, Craigslist, or local salvage yards. In urban areas, reclaimed wood boards sell for more — but even commercial salvage pricing is a fraction of what new hardwood ceiling planks cost. The boards are cut to length, sanded lightly on the face to remove surface debris without erasing the patina, and nailed directly to the ceiling joists with a pneumatic finish nailer.
The visual quality that makes this work is the color variation within reclaimed wood. No two boards are the same tone, and the range of grays, silvers, browns, and warm ambers in a single panel of barn wood creates a depth and complexity that no painted ceiling can replicate and that no new wood can authentically fake. This is the quality that makes a reclaimed wood accent panel look like it was installed by a designer rather than assembled from scrap.
For apartments and rental situations — which is the reality for many women doing budget renovations in New York, Chicago, and Los Angeles — removable panel applications mounted on a French cleat system rather than nailed directly to the ceiling make this approach renter-friendly. The panels come down cleanly when the lease ends, and the holes are minimized to the cleat fasteners rather than a field of nail points.
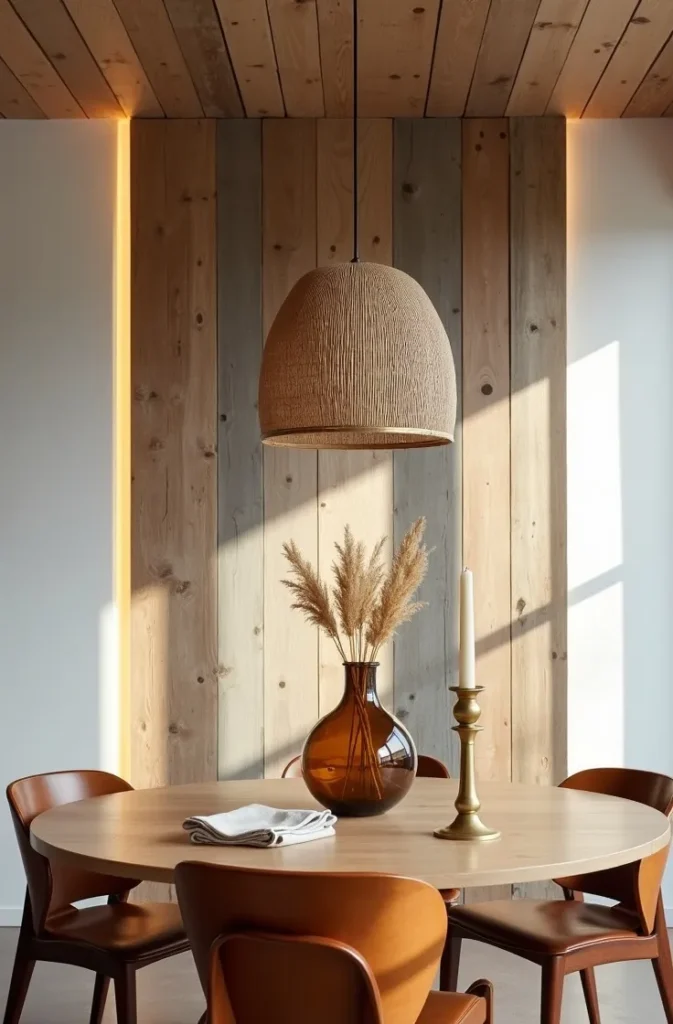
The Cedar Plank Ceiling That Smells Like Design and Costs Less Than New Flooring
Cedar ceiling planks are a material choice that operates on two senses simultaneously: they look warm and deliberate, and they release a scent that makes a room feel like the interior of a handmade home. That sensory dimension is not a small thing — it changes how a room feels every time you walk in, and it requires zero maintenance to deliver.
Western red cedar in a one-by-four or one-by-six tongue-and-groove profile is the standard for interior ceiling applications. It is dimensionally stable, naturally resistant to moisture and insects, and softer than pine — which makes it easier to cut and nail without splitting. The color range within a single bundle of cedar boards, from pale cream sapwood to deep reddish-brown heartwood, creates a natural variation that looks designed without requiring any staining.
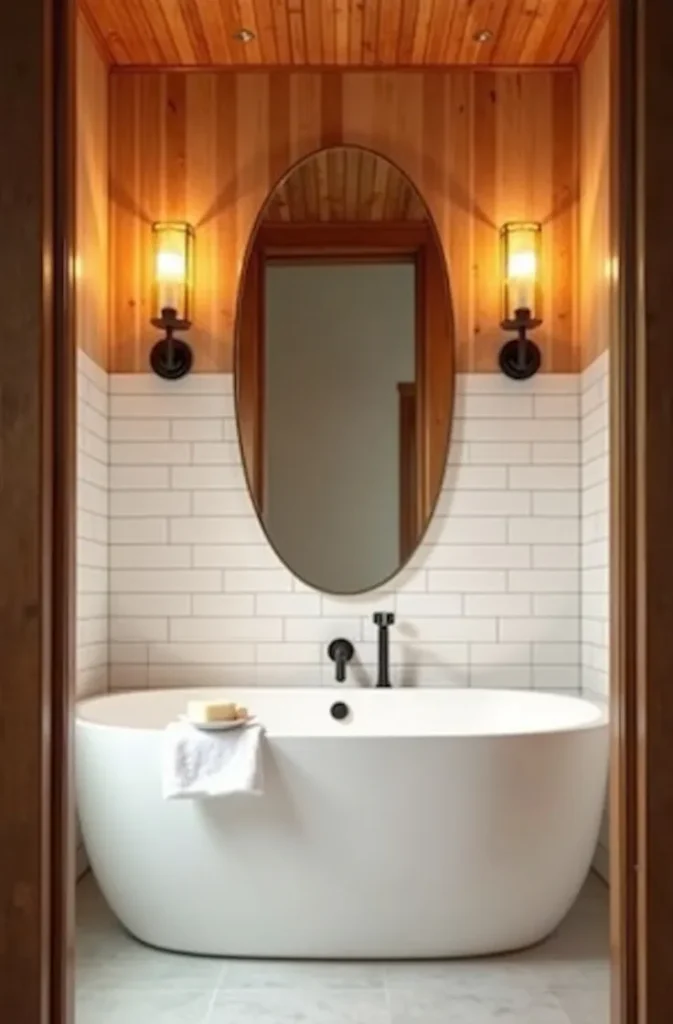
Cedar ceiling planks are the right material for bathrooms, laundry rooms, and mudrooms — spaces where moisture is present and where the natural oils in cedar provide a genuine protective function rather than purely aesthetic value. In a small bathroom in a California ranch house or a Midwest bungalow where the ceiling is the only surface with room for a design statement, cedar plank ceiling is the decision that makes the room feel like a spa rather than a utility space.
The mistake most people make with cedar ceiling: cutting the boards too tightly at the wall junction. Cedar expands with humidity, and a ceiling installed without adequate end clearance — at least a quarter-inch gap at each wall — will buckle across the field in a wet season. That quarter-inch is covered by the trim, it is invisible, and it is the difference between a ceiling that holds for decades and one that requires reinstallation after one humid summer.
The Painted Wood Slat Ceiling That Costs Under $100 and Makes Any Rental Look Designed
Wood slat ceilings — thin strips of wood spaced with deliberate gaps between them, typically revealing a painted or textured ceiling behind — have been one of the dominant ceiling trends of the last several years, and for good reason. The shadow play created by thin wood slats at close spacing changes throughout the day as the light angle shifts, which means the ceiling is never static. It is the most visually dynamic low cost wood ceiling treatment available.
The material is the cheapest part of the project. Standard furring strips at one-by-two or one-by-three dimensions, available at every lumber yard for less per linear foot than a cup of coffee, are the correct material for this application. Painted in a color that contrasts with the wall behind — matte black slats against a white ceiling, natural oak slats against a dark gray, whitewashed slats against a warm blush wall — the strips become a graphic installation rather than just a ceiling treatment.

This approach works especially well in rental apartments where the existing ceiling is damaged, stained, or too low to treat any other way. The slats mount on small adhesive clips or thin screws into the ceiling surface, and they can be removed without significant damage when the lease ends. For women in rental apartments in cities like Nashville, Austin, and Portland who want to invest in their space without losing a security deposit, this is the specific best low cost wood ceiling idea that delivers the most visual change for the least irreversible commitment.
What makes or breaks this treatment is the spacing-to-slat-width ratio. Equal spacing to slat width — a one-inch strip with a one-inch gap — creates a graphic, even rhythm that reads as intentional. Inconsistent spacing, or slats that are too wide relative to the gap, loses the rhythm and the ceiling reads as unfinished rather than designed. Measure, mark, and snap a chalk line for each row before you nail a single strip.
The Thin Board Batten Ceiling That Makes a Flat Box Room Feel Like It Was Designed From the Top Down
Board-and-batten on walls is one of the most pinned interior design treatments of the last decade. On the ceiling, the same technique delivers something different and arguably more dramatic: it creates a grid pattern overhead that gives a flat, characterless ceiling a coffered quality without any structural work and at a fraction of the cost of actual coffering.
The approach uses thin flat boards — typically half-inch MDF or half-inch pine ripped to three or four inches wide — applied in a grid pattern directly to the existing ceiling with construction adhesive and finish nails. The grid spacing, usually twelve to eighteen inches, creates rectangular panels between the battens that the eye reads as a coffered ceiling from any standing position in the room. Painted the same color as the existing ceiling, the battens disappear at a glance but create shadow definition that makes the ceiling read as architecturally detailed.
This is the treatment that interior designers use in dining rooms, foyers, and primary bedrooms when the renovation budget does not allow for actual coffered ceiling construction but the ceiling needs to do more than it currently does. In a 12-by-14 bedroom in a Midwest new-build home where every surface is perfectly smooth and perfectly blank, a board-and-batten ceiling grid in the same color as the walls — a treatment sometimes called a monochromatic coffered ceiling — reads as a considered architectural decision rather than a budget workaround.
The one measurement that makes this work: the grid proportions must relate to the room proportions. In a square room, use square grid panels. In a rectangular room, use rectangular panels that are proportionally wider than they are long. A ceiling grid that ignores the room’s footprint looks like it was laid out without a plan. A ceiling grid that mirrors the room’s shape looks inevitable.
The Peel-and-Stick Wood Ceiling Tile That Is Renter-Friendly and Actually Looks Real
Peel-and-stick wood veneer ceiling tiles occupy a product category that was, for a long time, genuinely terrible — the plastic imitation wood products that fooled nobody at close range. The newer generation of peel-and-stick real wood veneer tiles has changed that significantly. Actual wood veneer — a thin slice of real hardwood bonded to a foam or paper backing with a pressure-sensitive adhesive — installs without tools, removes cleanly from smooth painted ceilings, and looks like genuine wood because it is genuine wood.
The installation sequence is the most important part of making this look professional: start from the center of the ceiling and work outward rather than starting from a wall edge. A ceiling installed from the center maintains the symmetry that makes the pattern read as designed, while a ceiling started from a corner will inevitably end with uneven cuts visible along at least two walls. Find the center point, snap two chalk lines perpendicular to each other, and place the first tile at their intersection.
These tiles are the right solution for a rental bedroom or a home office where the ceiling is the most visible surface and the current condition — whether stained, cracked, or simply boring — is undermining the room. In a home office or a rental master bedroom in the suburbs of Atlanta, Denver, or Phoenix, a peel-and-stick wood veneer ceiling can completely reframe how the room feels without a single nail and without any consequence at move-out.
The honest limitation: peel-and-stick ceiling tiles do not read as identical to installed wood planks up close. The grout line between tiles and the slight variation in adhesion flatness are visible at close inspection. This treatment is designed to be seen from standing height — five to eight feet away — not from a ladder. At that distance, it delivers a quality result that no other removable ceiling option matches.
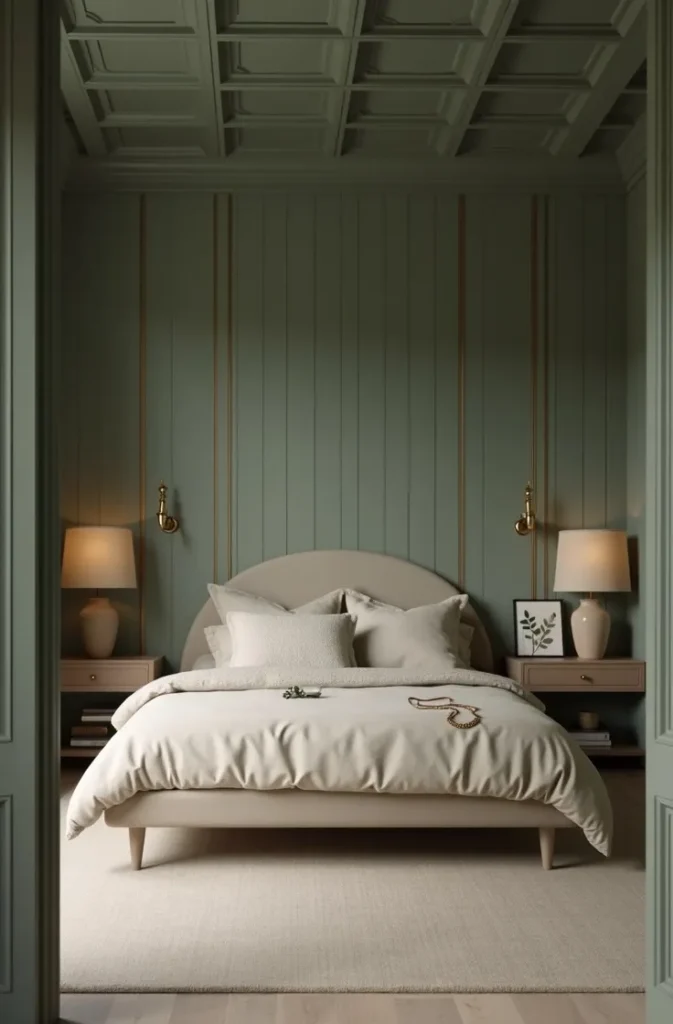
The Painted Plank Ceiling in a Deep Color That Makes a Small Room Feel Intentionally Intimate
Every low cost wood ceiling guide defaults to light finishes — white, cream, natural — because the conventional wisdom about small spaces is that everything should be kept pale. That advice is not wrong, but it misses the specific and powerful effect of a dark-painted wood plank ceiling in a small room: it creates the intimate, cocoon-like quality that expensive designers charge a great deal to achieve.
The material is standard pine shiplap or tongue-and-groove boards, but the finish is what changes the register entirely. A deep navy, a forest green, a warm charcoal, or a rich burgundy painted in a matte finish on the ceiling planks — with the walls kept in a lighter coordinating tone — lowers the perceived ceiling height in the way that makes a small room feel private and enveloping rather than cramped. The ceiling becomes a canopy. The room becomes a destination.
This treatment works best in primary bedrooms, reading nooks, and dining rooms — spaces where intimacy is the emotional goal rather than openness. In a small primary bedroom in a New York apartment or a Chicago brownstone, where the ceiling is the one surface not cut up by windows and doors, a dark-painted wood plank ceiling is the design decision that makes the room feel like a retreat rather than a box.
The paint choice matters more here than in any other wood ceiling application. Use a flat or matte finish, not eggshell or satin — any sheen on a dark ceiling reflects light in a way that emphasizes every surface imperfection in the wood. Matte finishes absorb light and make the ceiling plane recede, which is exactly the effect that makes a dark ceiling feel atmospheric rather than oppressive.
The Diagonal Wood Plank Pattern That Makes a Standard Ceiling Look Like Custom Architecture
Diagonal wood plank installation — running the boards at a 45-degree angle to the walls rather than parallel — is the simplest pattern variation in wood ceiling work, and it delivers a visual result that looks like a custom architectural detail rather than a DIY project. The diagonal creates a dynamic energy in the ceiling plane that horizontal or perpendicular installations cannot match, and it draws the eye upward rather than directing it toward the walls.
The installation process is more involved than a standard parallel run: every board must be cut at a 45-degree miter at both wall junctions, and the layout requires careful planning from a center chalk line rather than a wall starting point. That extra complexity adds time, not cost — the material is identical to any pine tongue-and-groove or shiplap installation, and the diagonal requires no special tools beyond a miter saw already set to 45 degrees.
This ceiling pattern is the right choice for a square room where a standard parallel plank installation would look static and directionless. In a square living room, kitchen, or bedroom, diagonal planks create a visual focal direction that the room needs. It is also the correct choice for a narrow room — a hallway, a galley kitchen, or a narrow bedroom — because the diagonal visually widens the ceiling span in a way that parallel-to-the-long-axis planks cannot.
What undermines a diagonal plank ceiling is inconsistent or mismatched board widths. The 45-degree lines only read as a deliberate pattern when every board is exactly the same width and every miter is tight. A single board that is slightly different in width — common in low-cost pine lumber that is not consistently milled — breaks the pattern visually. Sort your lumber before installation and set aside any board that is off-dimension by more than a sixteenth of an inch.
The Stenciled Wood Plank Ceiling That Adds Pattern Without Adding Cost
A stenciled wood plank ceiling combines two of the lowest-cost ceiling treatments available — paint and simple wood planks — into a result that looks hand-crafted and bespoke. The approach is to install standard white-painted shiplap or tongue-and-groove pine, then apply a repeating geometric or organic stencil pattern across the boards in a coordinating or contrasting color. The wood grain shows through the stenciled paint, creating a layered effect that no painted drywall ceiling can replicate.
The stencil itself is the most variable cost in this project, and it can be made at home using craft paper and a utility knife for essentially nothing, or purchased as a reusable plastic stencil from a craft supplier for under twenty dollars. The pattern choices are almost unlimited — a classic Moroccan tile, a simple geometric repeat, a botanical leaf shape — but the patterns that read most clearly on a wood-grain background are those with bold, clean edges rather than fine detail. Fine detail gets lost in the wood texture; bold shapes hold.
This treatment is designed for the woman who wants maximum personalization on a minimum budget — the renter who can paint over the stencil when she leaves, the homeowner who wants a ceiling that does not look like any other ceiling on her block. In a dining room in a California bungalow or a bedroom in a Midwest Victorian where the existing trim details suggest a level of care and craft that the ceiling has never matched, a stenciled wood plank ceiling finally brings the ceiling up to the level of the rest of the room.
The one practical rule: use a stencil brush rather than a roller for application on wood. A roller deposits paint unevenly on the raised and recessed parts of the wood grain, which blurs the stencil edges. A dry brush technique — minimal paint, dabbed rather than stroked — gives the cleanest stencil line on a textured wood surface and is the approach used by every decorative painter who does this professionally.
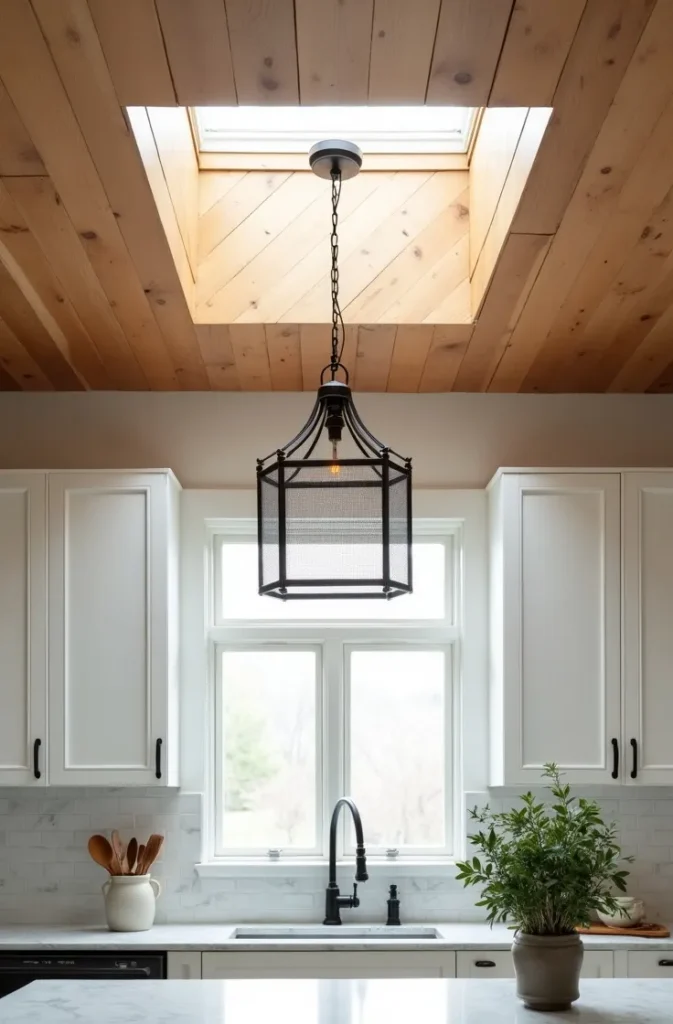
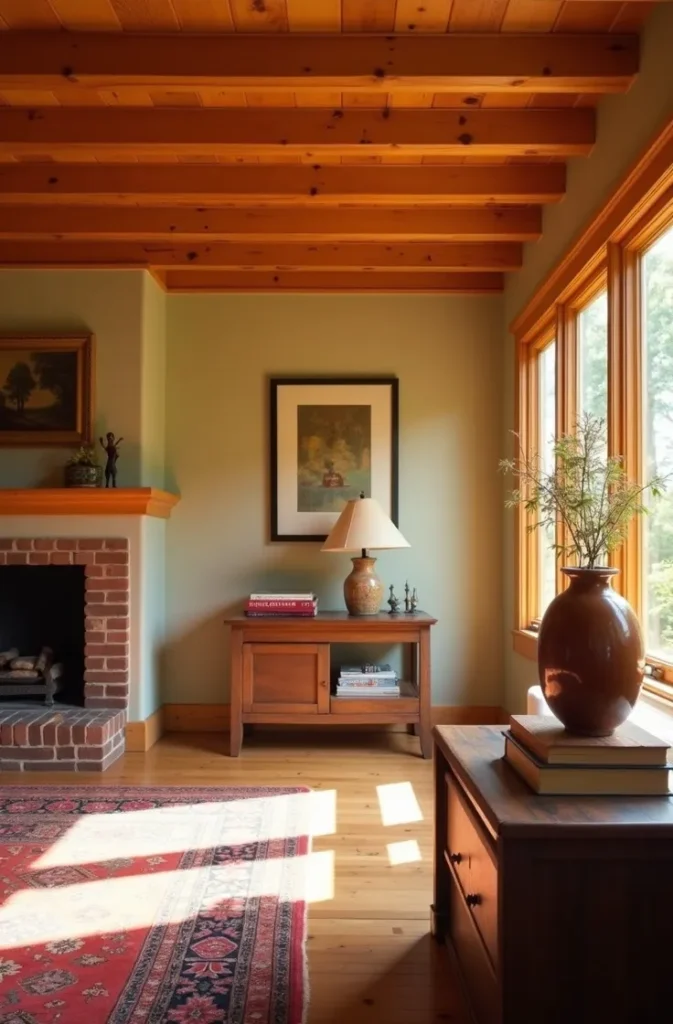
The Exposed Rafter Ceiling That Costs Nothing to Install Because It Is Already There
The single cheapest low cost wood ceiling idea is not installing anything new — it is removing what is already there. In many older American homes, particularly craftsman bungalows in the Pacific Northwest, farmhouses in the Midwest and Southeast, and cottages in New England, the ceiling is a layer of drywall or plaster applied beneath wood framing members that were never intended to be hidden. Removing that covering exposes the original rafter structure — and in most cases, reveals something far more interesting than what was covering it.
The work involved is demolition, not construction: removing the existing ceiling surface, cleaning and preparing the exposed framing, and deciding whether to paint, seal, or leave the wood in its natural weathered state. In homes where the rafters are true-dimension lumber — two-by-six or two-by-eight actual-size rather than the reduced modern dimensions — the exposed structure has a visual mass and authenticity that no installed ceiling product can replicate.
Before committing to this approach, two practical checks are non-negotiable: confirm that the ceiling does not conceal insulation that cannot be relocated, and confirm that no mechanical systems — ductwork, plumbing, wiring — run in a pattern that would be exposed and unacceptable to look at. In many older homes with simple rooflines, the ceiling space between rafters contains only insulation, which can be moved to the rafter bays between the exposed framing with rigid foam board and spray foam.
The finish decision is the creative call in an exposed rafter ceiling. In a cabin or a rural farmhouse, leaving the wood in its natural state with a clear sealer preserves the authenticity of the structure. In a more urban or modern context — a converted warehouse, a city bungalow — whitewashing or painting the rafters in a matte white against a dark ceiling board painted between the bays creates a graphic pattern overhead that looks like a deliberate design decision rather than an exposed structural accident.
You have fourteen specific, architecturally sound wood ceiling ideas here — not vague inspiration, but real material choices with real installation logic and real budget implications. Save this post before you buy a single board, and come back to it when you are standing in the lumber yard trying to remember which plank width you needed and why. Every ceiling treatment on this list has been chosen because it delivers genuine design impact without requiring a contractor, a significant budget, or a renovation timeline measured in months. That is the standard this resource is held to, every time.