DIY lattice screen ideas are one of the most practical solutions for homeowners who need privacy, shade, or visual structure without committing to solid fencing or permanent construction. This guide covers 15 distinct applications — each with material guidance, placement logic, and common mistakes to avoid — so you can choose the approach that actually fits your yard, porch, or garden layout.
1. Diagonal Wood Lattice Privacy Wall for Exposed Patios
A diagonal wood lattice panel mounted vertically between two posts creates an effective privacy screen for patios that sit close to a neighbor’s sightline or a street view. The diagonal pattern allows airflow through the screen while blocking direct views from a standing height, which makes it far more comfortable than solid fencing in warm climates.
Cedar and pressure-treated pine are the two most practical wood choices for this application. Cedar holds up without annual treatment in most USA climates. Pressure-treated pine is less expensive and equally durable but requires a sealer coat before painting or staining if you want a clean finish.
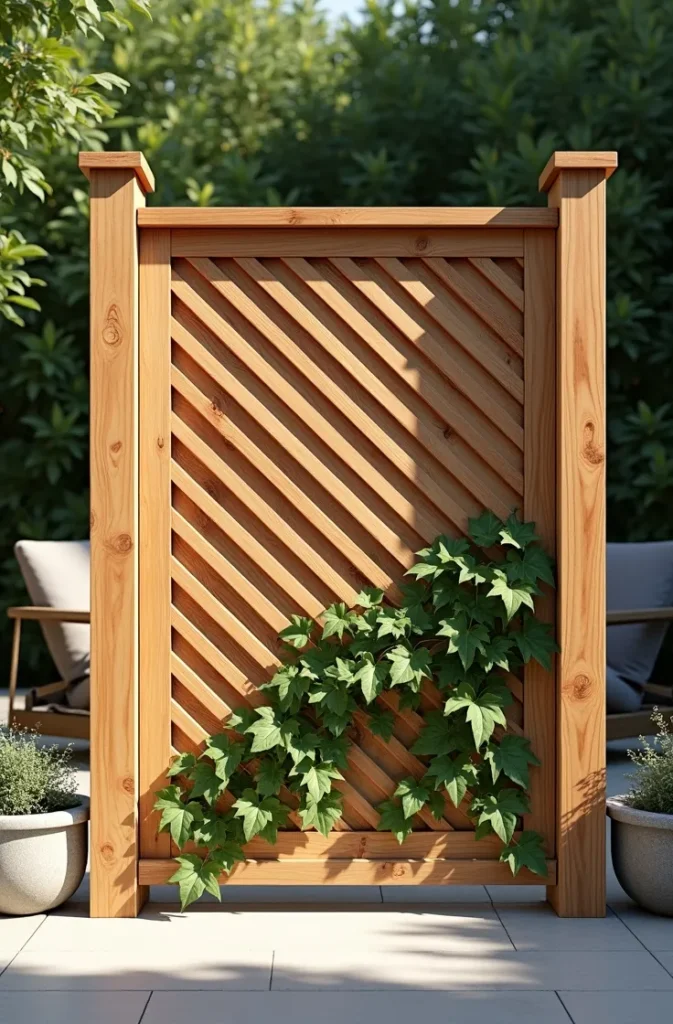

Mount the lattice between structural 4×4 posts set in concrete. The most common mistake here is attaching lattice directly to an existing fence or wall without a frame — unframed lattice flexes and warps within a single season. Build a perimeter frame from 2×4 lumber first, then attach the lattice panel inside it.
Use this design when your patio is at ground level and neighbors have a clear sightline from their yard or upper windows. For elevated decks, the panel height will need to increase accordingly, or you can angle the top section outward slightly to block elevated views.
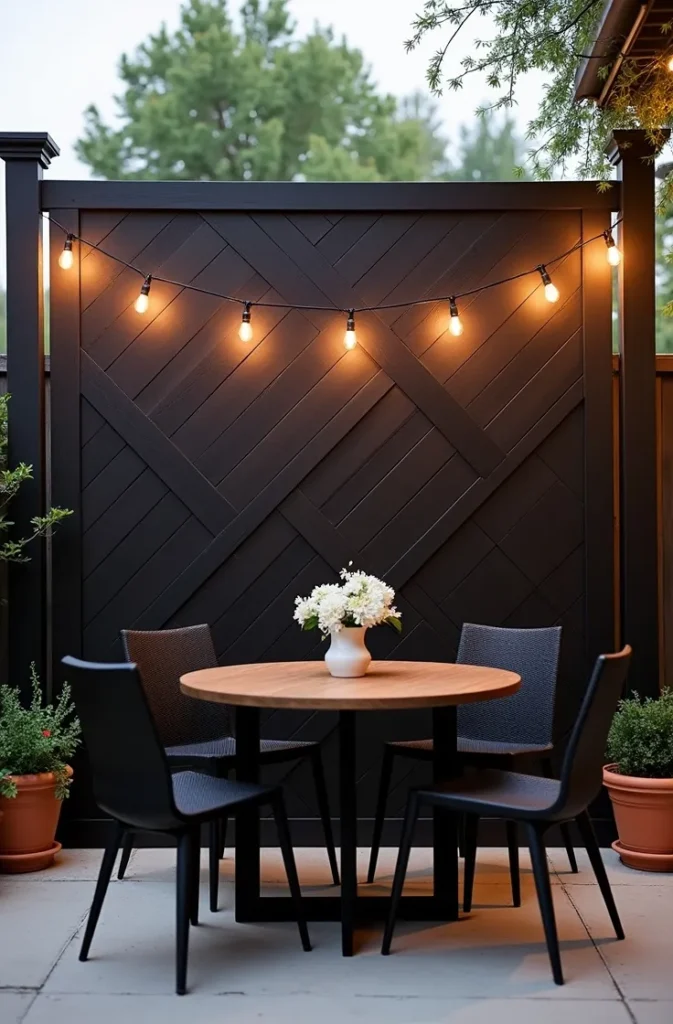
2. Painted Black Metal Lattice Screen for Modern Yards
A powder-coated black metal lattice screen introduces clean architectural contrast in yards with white, gray, or warm-toned exteriors. Metal lattice is significantly more rigid than wood, holds its shape in high-wind areas, and requires almost no maintenance once installed — no painting, no warping, no rot.
Aluminum and steel are the two main metal options. Aluminum is lighter and naturally rust-resistant, which makes it the better choice for coastal climates. Steel is heavier and more rigid, better suited for large spans where flex would be noticeable. Both are available in powder-coated black finishes from most fencing and landscape supply retailers.
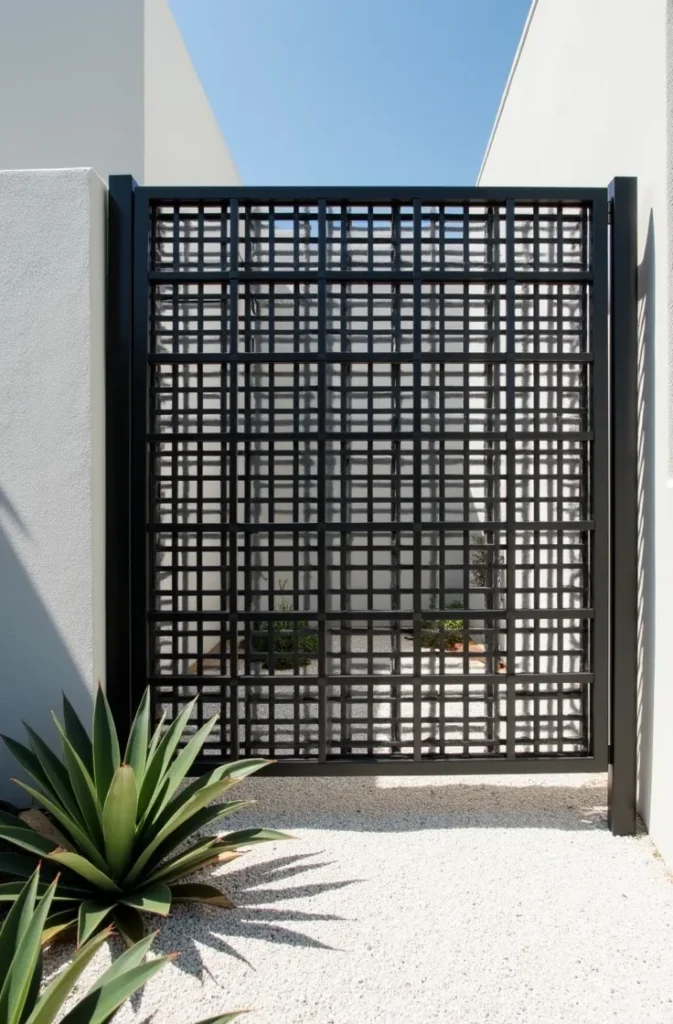
The visual appeal of black metal lattice comes from restraint. It works because the pattern reads as a graphic element rather than a material one. Keep the surrounding palette simple — white gravel, concrete, or a single low-planted green border — so the screen stays as the focal point.
Avoid using metal lattice in areas with poor drainage where standing water contacts the base. Even rust-resistant aluminum develops cosmetic oxidation at the contact points over time. Mount metal lattice a minimum of two inches above any ground surface using post-mounted brackets.
3. DIY Lattice Trellis Panel for Vertical Vegetable Gardens
A freestanding lattice trellis panel used as a vertical garden structure is one of the most functional diy lattice screen ideas for small yards where ground planting space is limited. Running beans, cucumbers, tomatoes, and climbing squash all perform better on a vertical surface than sprawling horizontally — yields increase, air circulation improves, and harvesting becomes easier.
For a vegetable-specific trellis, pressure-treated wood lattice or galvanized steel wire mesh are the most appropriate materials. Avoid decorative cedar lattice with wide spacing for vegetable use — the gaps between slats are too large for most annual climbers to grip without additional training wire. A spacing of two to four inches between lattice members is ideal for vegetable cultivation.
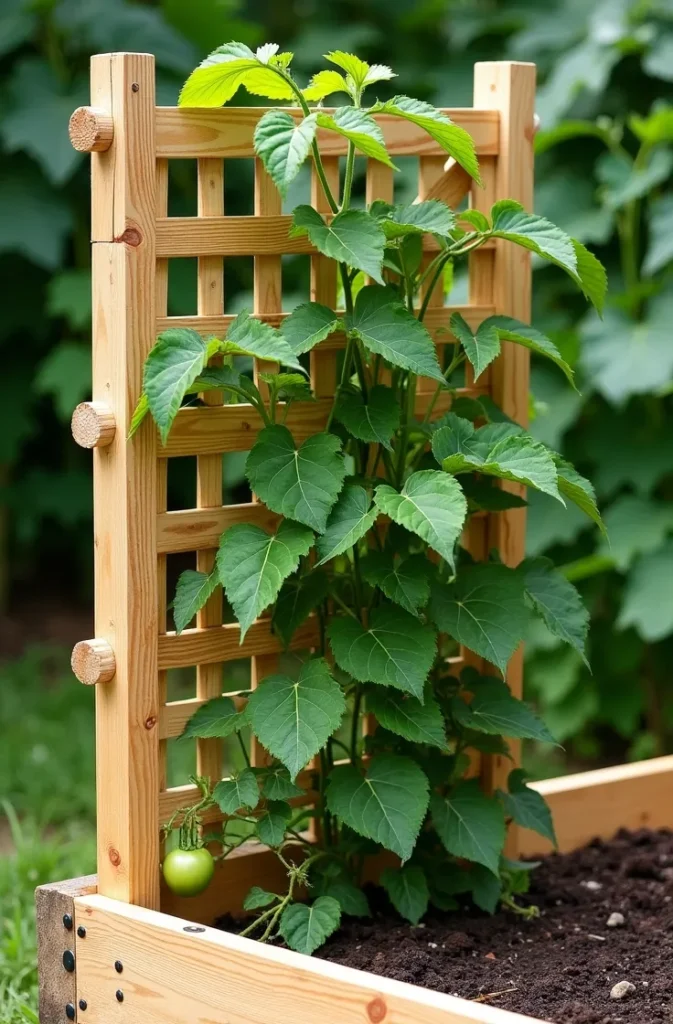
Set the panel in a raised bed or ground frame at a slight backward lean of five to ten degrees. This angle causes climbing plants to lean into the lattice naturally and reduces wind-load pressure on the structure. A fully vertical panel in an exposed yard requires heavier post footings to remain stable under plant weight and wind.
Position the trellis on the north side of your growing bed so it does not shade lower-growing crops. South of the trellis is where your full-sun herbs, peppers, and compact vegetables should sit. This placement decision affects harvest quality far more than material selection.
4. Lattice Screen Fence Topper for Added Privacy Without Full Replacement
Adding a lattice panel section on top of an existing fence is one of the most cost-effective ways to increase privacy without tearing out a functional structure. A 24-inch lattice topper raises a standard six-foot fence to an effective eight-foot privacy height, which significantly reduces sightlines from neighboring second floors and elevated decks.
The key structural requirement is that the existing fence posts extend above the fence boards, or that you install new post extensions before attaching the lattice frame. Do not simply nail a lattice panel to the top of fence boards without post support. Wind load on an unsupported topper will pull the entire assembly loose within a season.
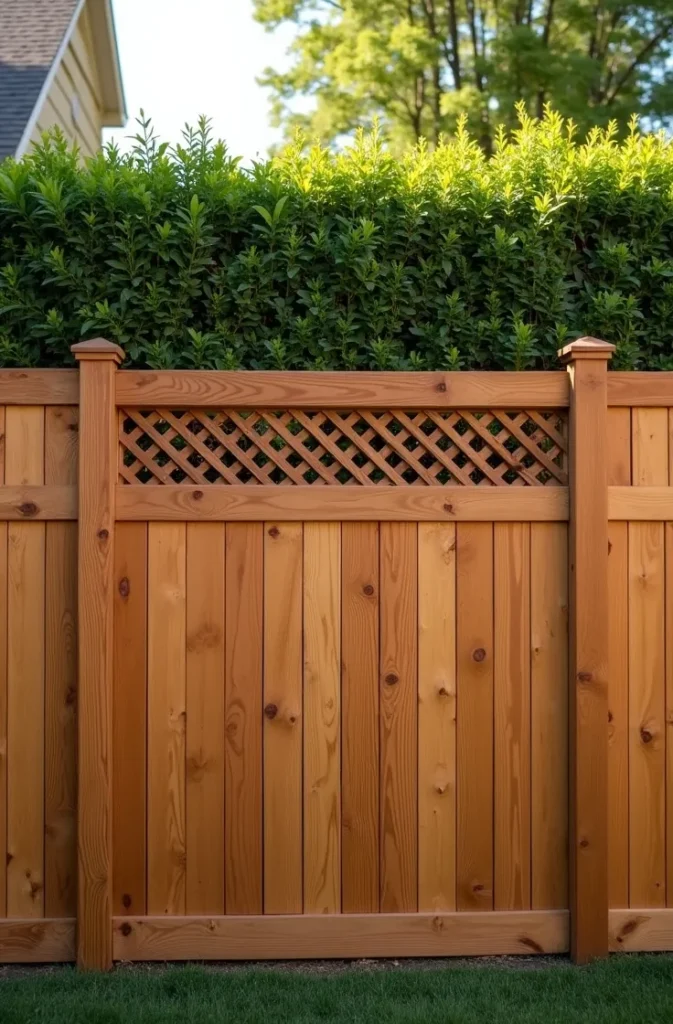
Match or complement the lattice material to your existing fence. A cedar fence looks best with a cedar lattice topper finished in the same stain. A white vinyl fence pairs cleanly with white vinyl lattice. Mixing materials creates a patchwork appearance that reduces the visual quality of both elements.
This approach is particularly effective for homeowners in HOA communities where fence height is capped but lattice toppers are permitted as a separate category. Check your local regulations before building — many municipalities and HOAs treat lattice extensions differently than solid fence height increases.
5. White Vinyl Lattice Screen for Low-Maintenance Porch Skirting
Lattice panels used as porch skirting close the visual gap between a raised porch deck and the ground, concealing the structural underside while maintaining airflow. White vinyl lattice is the standard choice for this application because it never needs painting, resists moisture, and installs quickly with basic tools.
The correct installation method channels the lattice into a pressure-treated bottom rail set slightly above grade and a horizontal top rail fastened to the porch rim joist. Running lattice directly into soil contact causes premature deterioration even in vinyl products. A one-inch clearance between the bottom of the lattice and the ground surface is the minimum standard.
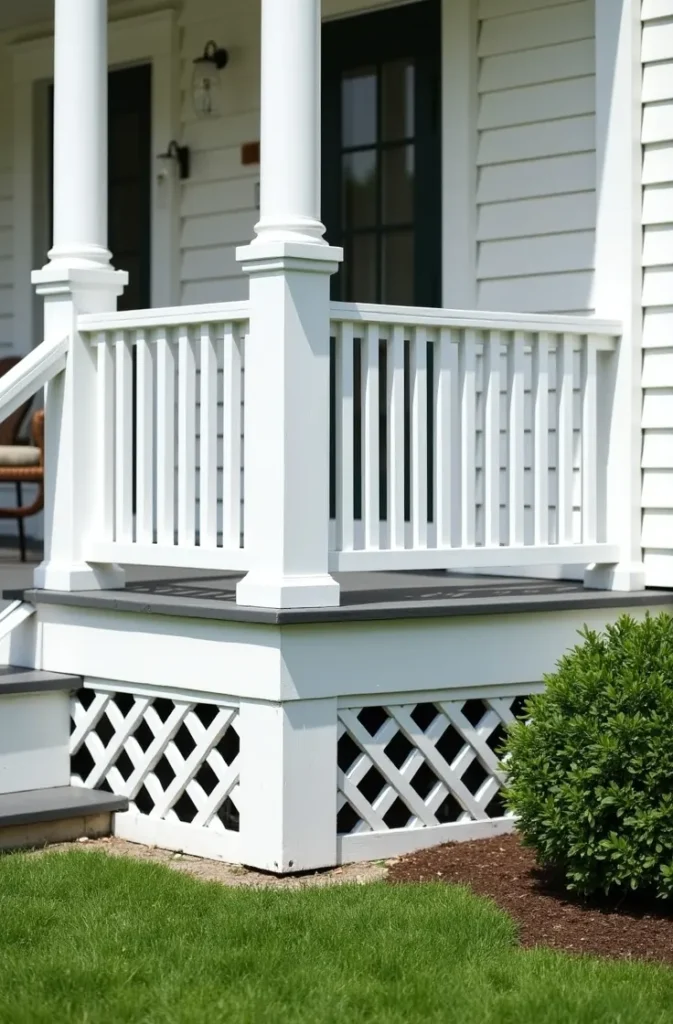
Include at least one access panel in the skirting for utility access — plumbing cleanouts, HVAC components, and pest control inspections all require periodic entry under a raised structure. A hinged lattice access door using the same material as the surrounding skirting is nearly invisible when closed and takes only a few additional hours to build.
White porch skirting works on both traditional and transitional home styles. For modern or craftsman homes, consider square-pattern lattice rather than the standard diagonal pattern — the square grid reads as more intentional and contemporary in those architectural contexts.
6. Freestanding Lattice Room Divider for Open Outdoor Living Areas
A freestanding lattice panel used as an outdoor room divider creates visual separation between a dining area and a lounging zone on a large patio or deck — without permanent construction and without blocking light or airflow. This is one of the most flexible diy lattice screen ideas because the panel can be repositioned seasonally or removed entirely.
Build freestanding panels on a weighted base rather than driving posts into the ground. A concrete-filled planter base or a welded steel footing plate adds enough mass to keep a four-foot by six-foot panel stable in moderate wind. Anything taller than six feet in a freestanding configuration needs heavier footings or diagonal brace legs extending behind the panel.
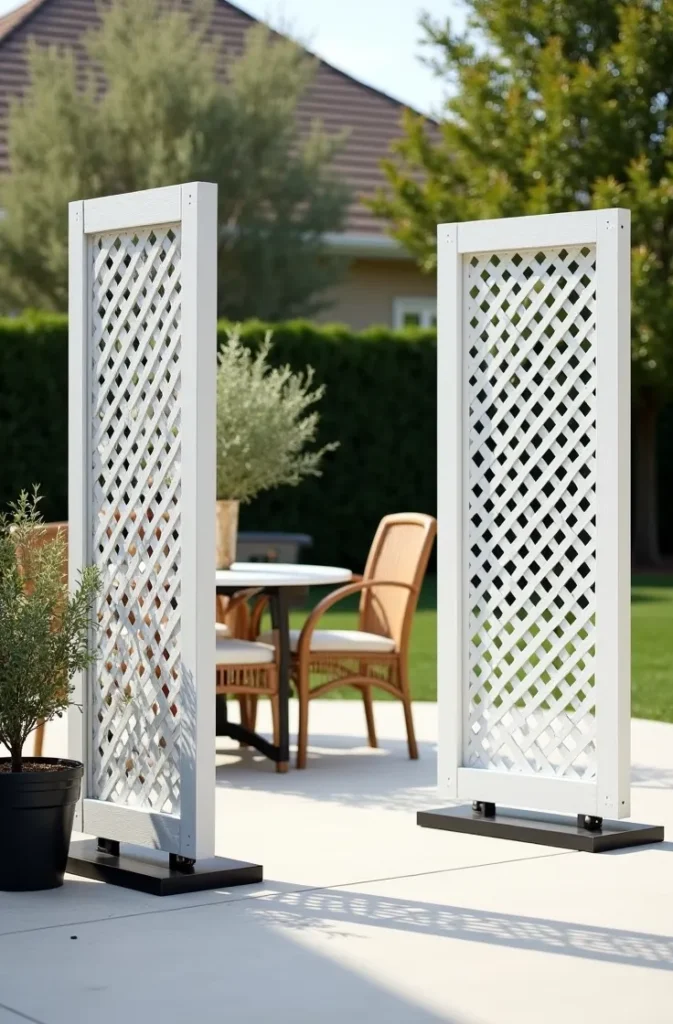
Two panels placed at a slight angle to each other — in a soft V-shape rather than a straight line — create a more enclosed, intimate feel than a single flat panel. The angled configuration also improves lateral stability without requiring additional hardware.
Use this approach when you rent your property and cannot make permanent modifications, when you want seasonal flexibility, or when you are testing a layout before committing to a built-in structure. It is not a substitute for a structural privacy fence in exposed, high-wind locations.
7. Natural Cedar Lattice Garden Screen With Built-In Planter Box
Combining a lattice privacy panel with an integrated planter box at its base creates a cohesive, planted structure that works harder than either element alone. The lattice provides immediate privacy from day one while climbing plants gradually fill the panel over one to two growing seasons, eventually creating a living green screen.
Build the planter box from the same cedar as the lattice frame to ensure visual consistency. Size the planter at a minimum of 12 inches deep and 12 inches wide to support climbers with established root systems. Shallow planters — under eight inches — dry out quickly in summer heat and stress the plants before they reach a useful coverage height.
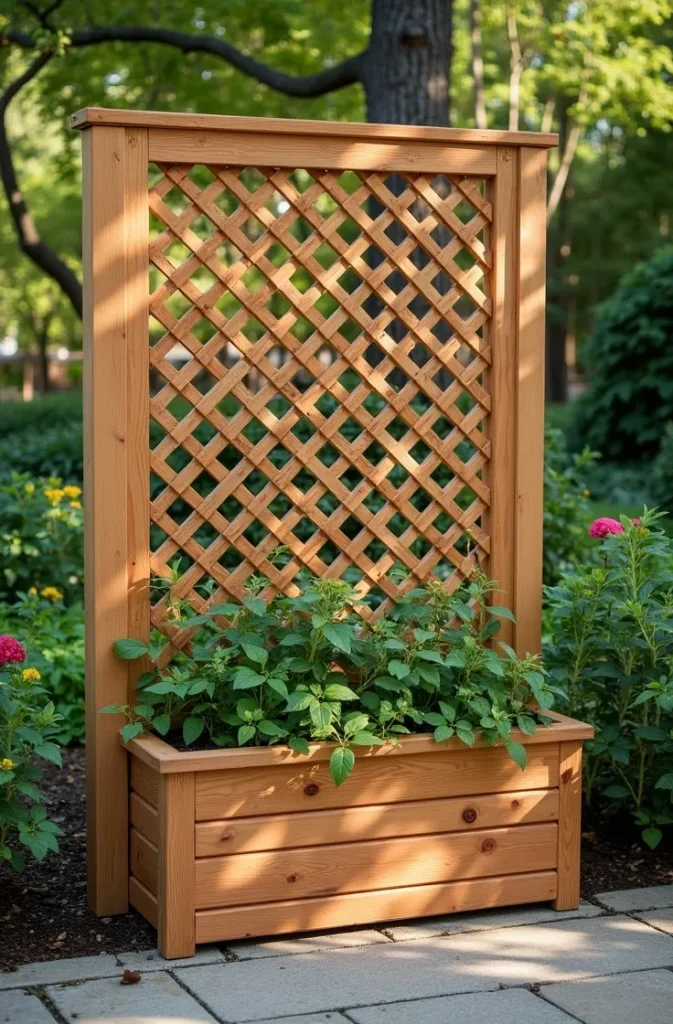
Choose your climbing plant based on your privacy timeline. Fast-growing annual vines like morning glory or black-eyed Susan vine cover a panel in a single season but die back each fall, requiring replanting. Perennial climbers like climbing hydrangea or Virginia creeper take two to three years to reach full coverage but return each spring and require no replanting after establishment.
This design is well-suited to deck edges, garden bed borders, and side yards where a planted buffer between properties is both practical and aesthetically appropriate. It also qualifies as one of the most pinnable lattice fence panel ideas because the finished result photographs beautifully at every stage of plant growth.
8. Lattice Shade Canopy Over a Pergola Opening
Lattice panels installed horizontally across an open pergola roof create partial shade without the visual heaviness of a solid roof. The filtered light pattern shifts throughout the day, keeping the space cooler than an open pergola while maintaining the outdoor feel that makes a pergola worth building in the first place.
Diagonal lattice on a horizontal plane filters approximately 40 to 50 percent of direct sunlight depending on the slat width and spacing. This is enough to reduce surface temperatures noticeably on a hot afternoon but not enough to block the light plants need if you are growing anything below. It is also insufficient for rain protection — do not design a lattice canopy as a substitute for waterproofing.
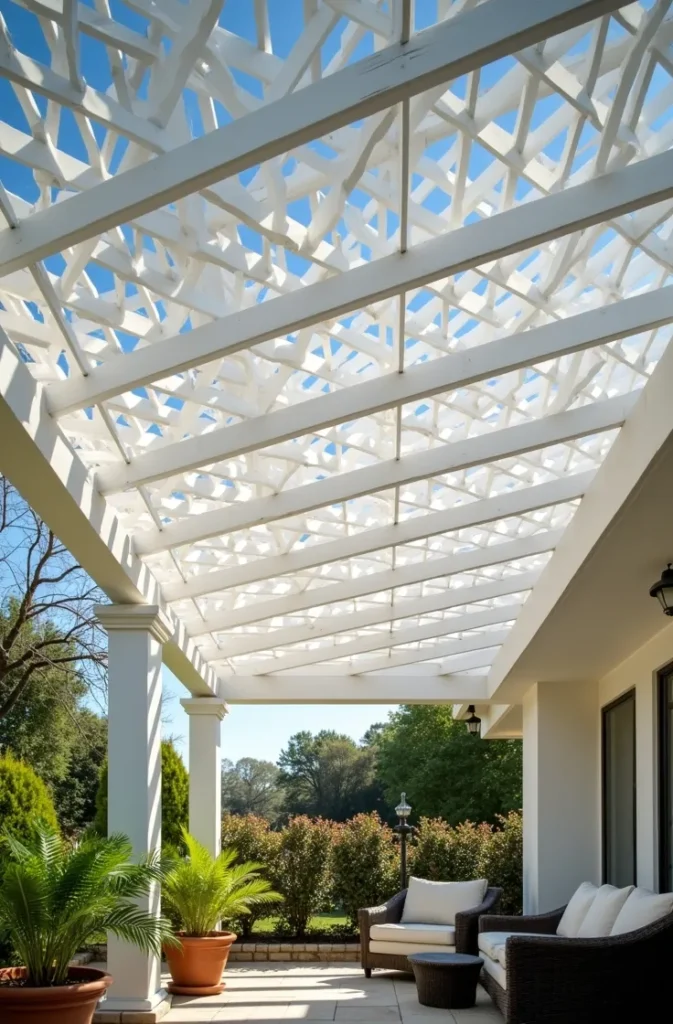
Fasten lattice panels to the top of the pergola rafters using galvanized or stainless screws, not nails. Nails back out over time as the wood expands and contracts seasonally. Countersink the screws and fill the holes if you want a finished appearance from below.
This horizontal lattice approach works in both traditional and modern pergola styles. A white-painted diagonal lattice reads as traditional. A square-grid natural cedar lattice in a contemporary pergola reads as modern and architectural. Match the pattern to the character of the surrounding structure.
9. Black-Stained Lattice Panel as a Backyard Backdrop Wall
A large lattice panel stained in matte black serves as a visual backdrop for an outdoor dining or entertaining area. The dark panel absorbs surrounding light and draws the eye, making furniture, plants, and tabletop settings appear more deliberate and designed against it. It is one of the most effective lattice backyard privacy solutions for homeowners who want their outdoor space to photograph well.
Scale matters significantly here. A backdrop panel should be at least six feet wide and six feet tall to function as a true visual anchor. A smaller panel disappears visually once furniture and plants are arranged in front of it. For a wider dining area, two panels mounted side by side with a narrow gap between them read as a single cohesive backdrop.
The matte black stain requires a proper base coat on raw wood before the color coat is applied, particularly on cedar, which has natural oils that cause adhesion problems for some exterior stains. Use an oil-based penetrating stain designed for outdoor use, not a water-based deck paint — the finish lasts significantly longer and requires less maintenance.
Position outdoor uplighting at the base of the panel to illuminate it from below at night. This transforms the panel from a daytime design element into an atmospheric evening feature. Warm white uplights work with wood and plant material. Cool white uplights suit a more contemporary, architectural setting.
10. Lattice Enclosure for HVAC Units and Utility Equipment
Outdoor HVAC condensers, utility meters, and garbage bin areas are functional necessities that most homeowners would prefer not to see from the yard, patio, or street. A three-sided lattice enclosure solves this cleanly without blocking the airflow that HVAC equipment requires to operate efficiently.
A three-sided design rather than four-sided is non-negotiable for HVAC enclosures. Condenser units require a minimum of 18 to 24 inches of clearance on the service side and adequate airflow on all remaining sides to prevent overheating and efficiency loss. A fully enclosed unit with restricted airflow will shorten the equipment lifespan significantly. Check your equipment manufacturer’s specifications before finalizing the enclosure dimensions.
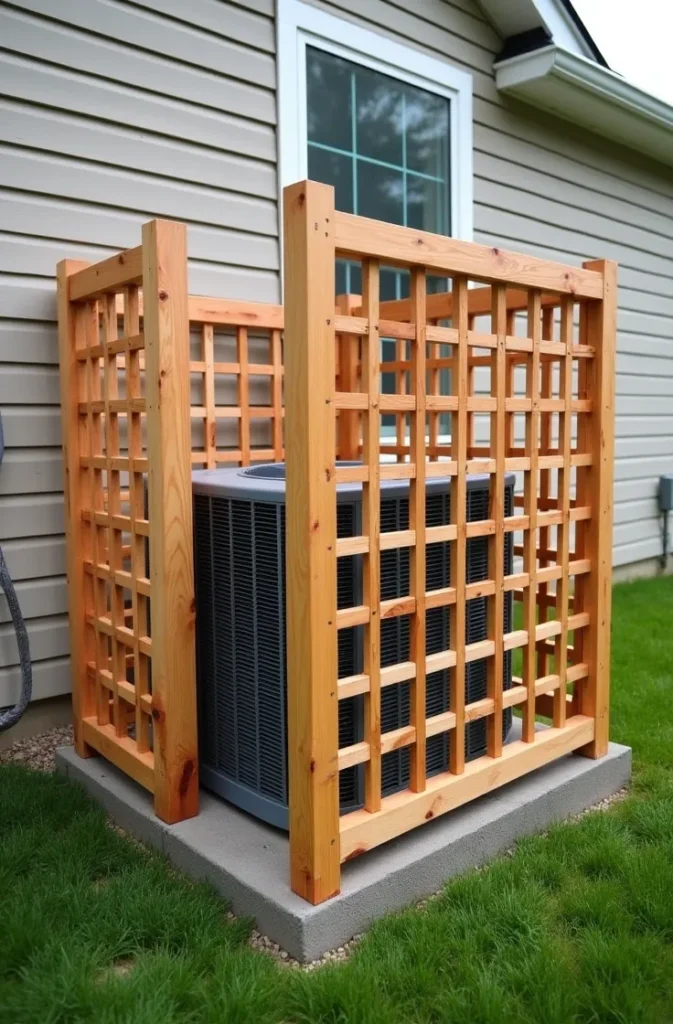
Build the frame from pressure-treated lumber and use a lattice that matches your fence or home exterior to create visual continuity. Leave the open side facing away from the primary viewing angle — typically the back or side of the unit — so the equipment is hidden from where you spend time without obstructing the service panel or airflow path.
For garbage bin and recycling enclosures, a four-sided design with a hinged gate is appropriate since airflow is not a requirement. Use the same lattice material as the HVAC screen to create a cohesive utility zone rather than two mismatched structures.
11. Painted Lattice Window Shutters for Garden Shed Exteriors
Decorative lattice panels used as shutters flanking a garden shed window add architectural character to a structure that would otherwise look purely utilitarian. This approach is inexpensive, installs in a single afternoon, and dramatically improves the shed’s appearance from the yard.
Cut lattice panels to match the height of the window and approximately half its width, so the two panels together frame the window symmetrically. Mount them flat against the shed exterior using exterior-rated hinges if you want them to function, or fixed decorative mounts if function is not a priority. Functional lattice shutters that actually close provide a secondary benefit: they protect single-pane shed windows during hail or debris events.
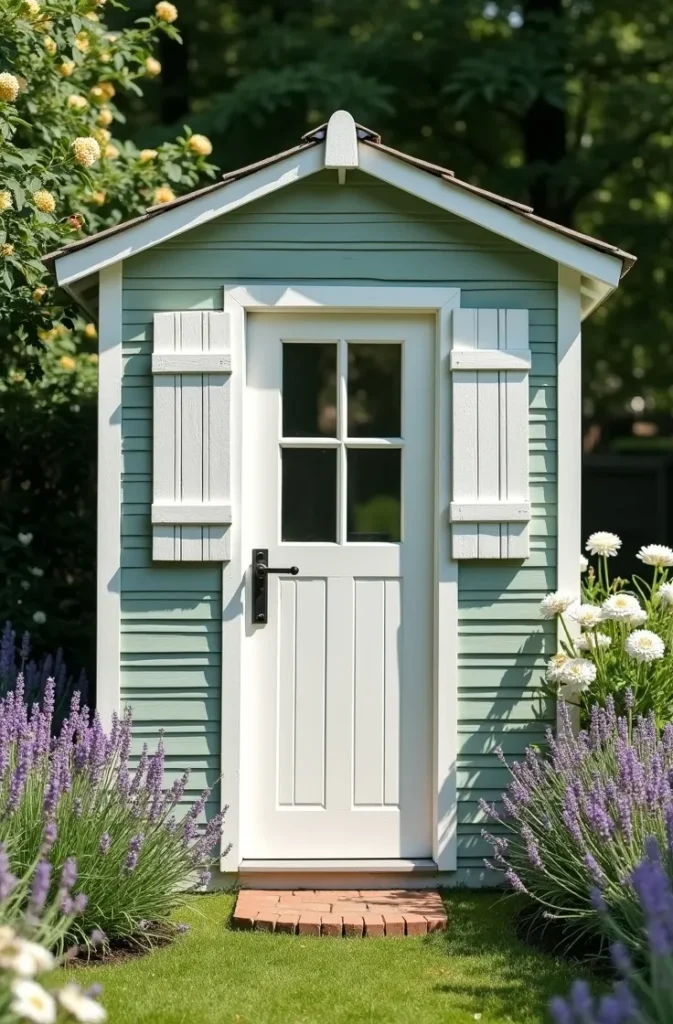
Paint is the finishing decision that matters most here. A color that contrasts the shed body — white shutters on a dark green shed, black shutters on a white or gray shed, deep blue on a natural wood shed — creates a deliberate, designed look. Matching the shutter color to the shed body makes the shutters disappear rather than adding character.
This idea extends naturally beyond sheds. The same approach works on playhouses, chicken coops, pool equipment sheds, and garage side doors. Any outbuilding that benefits from a more finished appearance can be improved with lattice shutter panels.
12. Lattice Side-Yard Screen for Narrow Passage Privacy
Side yards — the narrow corridor between a house and the property line — are often the least-designed part of a residential property. They tend to accumulate clutter, expose utility equipment, and create an uninviting passage between front and back yard. A lattice screen across the opening of a side yard creates an immediate sense of enclosure and intention.
A lattice gate panel at the entry point of the side yard, rather than a solid gate, maintains the visual lightness of the narrow space while providing a clear boundary. A solid gate in a narrow side yard can feel oppressive and makes the passage darker. The open pattern of a lattice gate preserves a sense of depth.
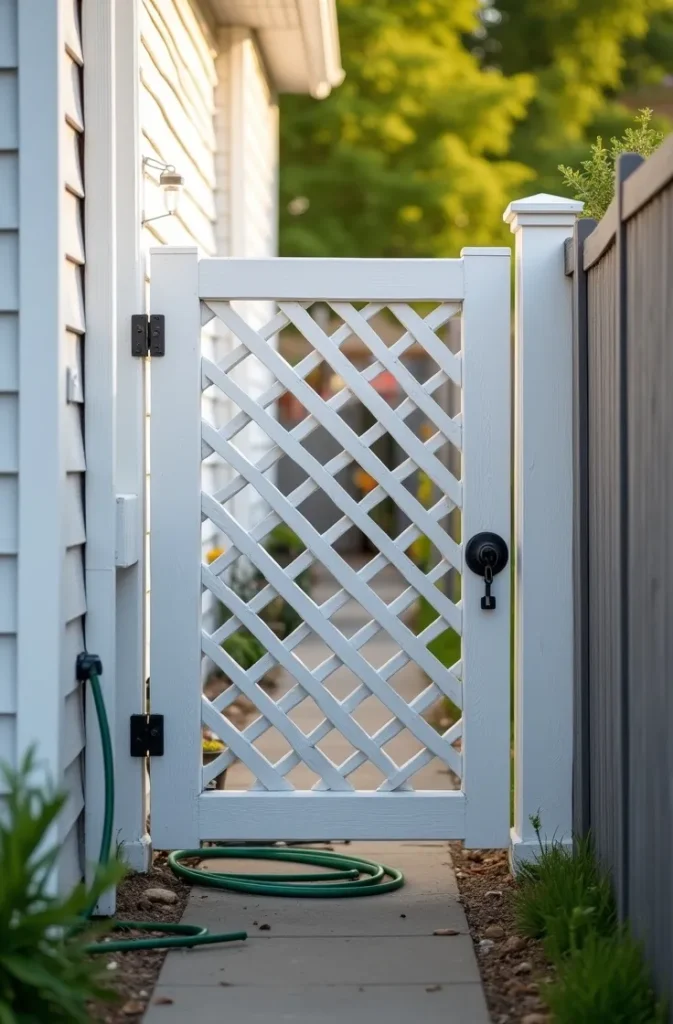
If the side yard is also used for garden storage or utility access, consider a full lattice side-yard screen system: a gate panel at the front entry and a second fixed panel at the back exit, with optional side panels along the house foundation or fence line to organize the space visually.
Lattice fence panel ideas work particularly well in side yards because the space is rarely seen in isolation — it is a transitional zone. A single well-built lattice gate at the street-facing end solves the curb-appeal issue without requiring treatment of the entire corridor.
13. Stained Lattice Headboard Panel for Covered Outdoor Sleeping Porches
A large lattice panel mounted as a decorative headboard on a covered sleeping porch or outdoor bedroom area creates immediate architectural focus in a space that otherwise risks feeling undesigned. The lattice scale — typically four feet wide by four feet tall — works well behind a daybed or porch swing arrangement.
Use a premium exterior wood and a hand-applied stain in a deep, warm tone — walnut, dark mahogany, or a rich ebony — for the most refined result. The contrast between a deeply stained lattice panel and light-colored porch walls or white ceiling creates a layered, intentional look without requiring structural changes.
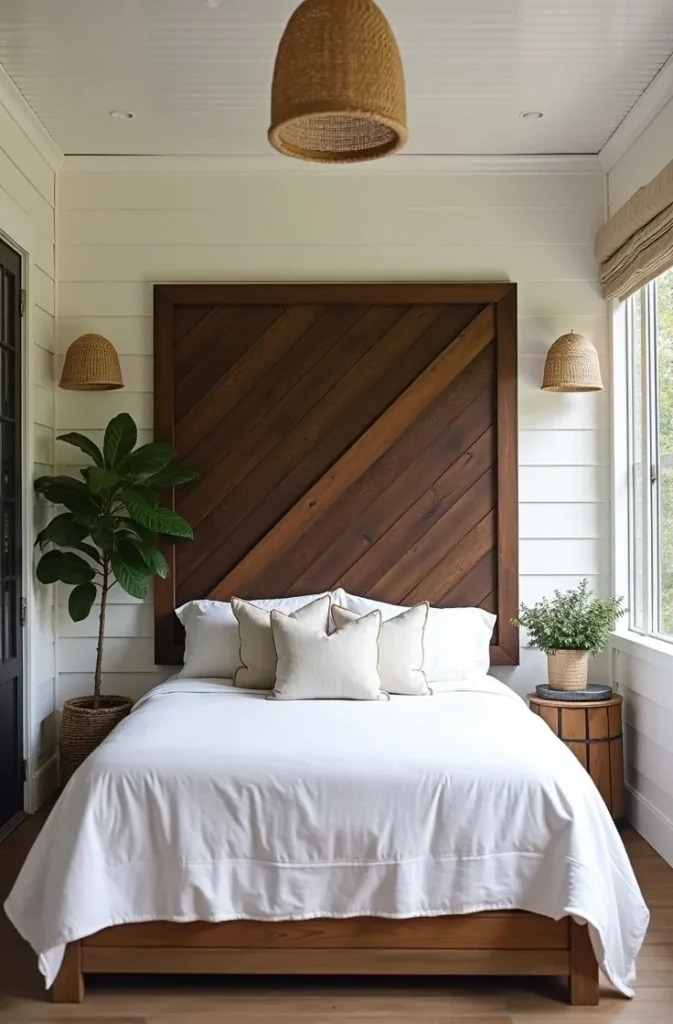
Mount the panel flush to the wall or set it slightly forward on standoffs. Standoff mounting — holding the panel one to two inches away from the wall — creates a subtle shadow line around the panel that gives it a framed, floating appearance. This detail distinguishes a thoughtfully made piece from a basic installation.
This is one of the more creative diy lattice screen ideas in terms of interior-exterior crossover application. The concept translates the design logic of an indoor decorative headboard into an outdoor setting, which is particularly effective in spaces designed for relaxation and visual calm.
14. Geometric Square-Grid Lattice Panel for Contemporary Privacy Fencing
The standard diagonal lattice pattern reads as traditional or cottage in style. Substituting a square-grid (on-axis) pattern shifts the same material into a contemporary, architectural register. For homeowners with modern or transitional home styles, a square-grid lattice panel achieves privacy and structure without the decorative associations of the classic diamond pattern.
Build square-grid panels using 1×2 lumber cut to equal lengths and assembled in a perpendicular grid on a 2×4 perimeter frame. The grid spacing determines the openness of the panel — a four-inch square grid provides substantial privacy; a six-inch grid is more open and decorative. For privacy fencing, stay at four inches or under.
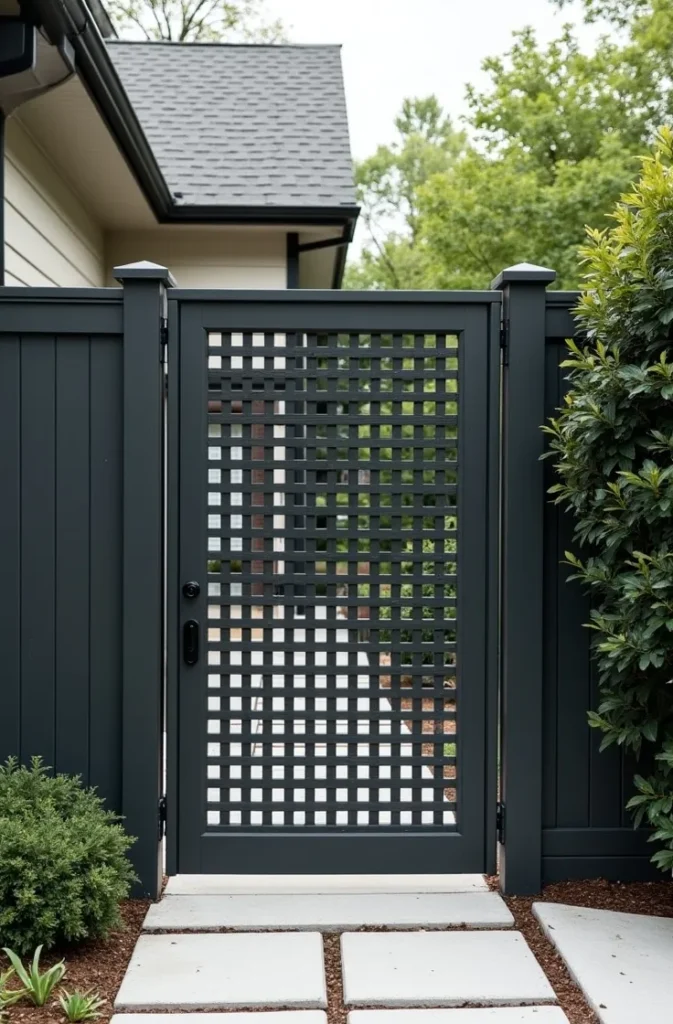
The finish matters as much as the pattern here. A square-grid panel in raw cedar ages beautifully to silver-gray. Painted charcoal gray or matte black, it reads as modern architectural fencing. Left natural with a clear penetrating sealer, it suits contemporary craftsman or organic modern aesthetics.
This panel style works equally well as a full fence section, a garden room divider, or a planter-mounted screen. The consistent grid pattern repeats at any scale without losing its visual logic, which makes it one of the most versatile outdoor lattice privacy screen configurations for modern residential properties.
15. Lattice Room Divider for Covered Carport Privacy and Curb Appeal
An open carport attached to the front of a house exposes the interior — parked cars, storage shelves, utility equipment — to direct street view. A lattice panel screen across one or both open sides of the carport creates visual closure without obstructing the ventilation and natural light that a carport design depends on.
Size the lattice panels to fit the structural bays of the carport. Typically this means panels spanning between existing roof support posts. Do not reduce the structural carport opening with framing that conflicts with the turning radius needed to park. Measure the required clearance before designing the screen position.
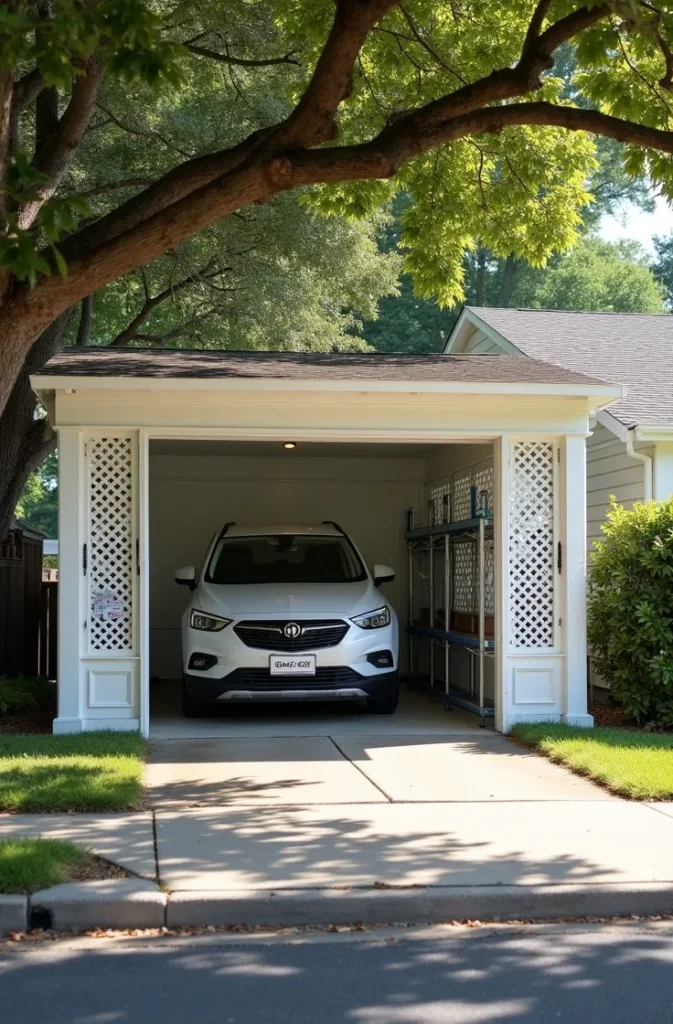
A carport lattice screen is one of the highest-ROI outdoor lattice privacy screen applications for homes on corner lots or shallow setback properties where the front elevation is highly visible. The improvement to curb appeal is immediate and the construction cost is low relative to the visual impact.
Paint or stain the lattice to match the home’s trim color for a fully integrated appearance. When the lattice reads as an intentional part of the building envelope rather than an add-on, it raises the overall quality perception of the property significantly. This small decision — matching the trim color — separates a polished result from a patchwork one.
Final Thoughts
A well-chosen lattice screen does more than add privacy — it defines space, improves curb appeal, and solves practical problems that solid fencing, walls, or plantings cannot always address as flexibly or affordably. The fifteen ideas in this guide cover a wide range of applications, from functional HVAC enclosures to decorative porch accents, so regardless of where your need is located, there is a configuration here that fits.
Save this post before you start shopping materials. Having a reference for the right lattice pattern, wood species, finish, and installation method for your specific situation prevents the most common and costly DIY mistakes — undersized frames, wrong materials for climate, and panels installed without adequate structural support.
When you are ready to go deeper, explore outdoor privacy screen ideas for specific lot types, or look into pergola lattice canopy designs for covered outdoor living spaces. The right lattice solution is almost always simpler and less expensive to build than most homeowners expect.