Most backyard sandboxes fail within two seasons — not because kids lose interest in sand play, but because the structure was not built to handle weather, drainage, or the reality of a busy family yard. These sandbox ideas backyard 2026 cover ten distinct approaches organized around real decisions: available space, budget range, safety requirements, and long-term yard function. Every idea here includes the practical details that make the difference between a sandbox that lasts and one that turns into a muddy, cat-visited problem within a year.
1. Cedar Frame Sandbox With a Fitted Lid That Doubles as a Bench Seat
A cedar sandbox with a hinged or removable lid that converts to a bench seat when open is one of the most practical backyard sandbox designs for family yards because it solves two problems simultaneously: sand protection from weather and animals, and the need for additional seating near a play area.
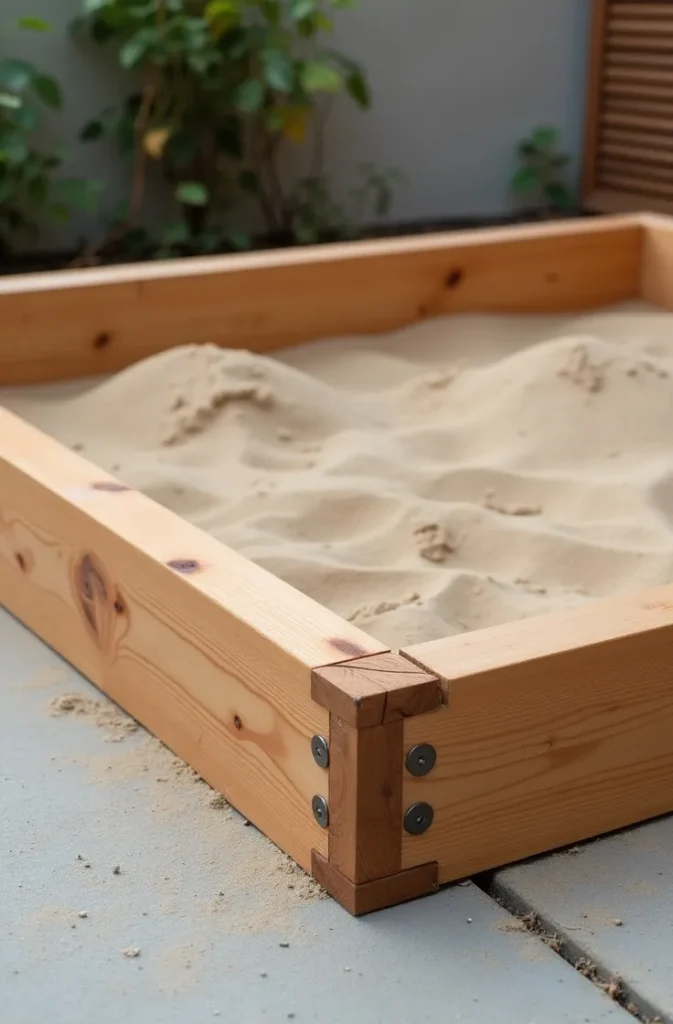
Cedar is the correct material choice for ground-contact sandbox frames in USA climates. It is naturally rot-resistant without chemical treatment, which matters for a structure that will be in direct contact with both soil and sand. Pressure-treated lumber, while durable, uses chemical preservatives that are not appropriate near the sand children play in daily. This is a distinction worth understanding before purchasing materials.
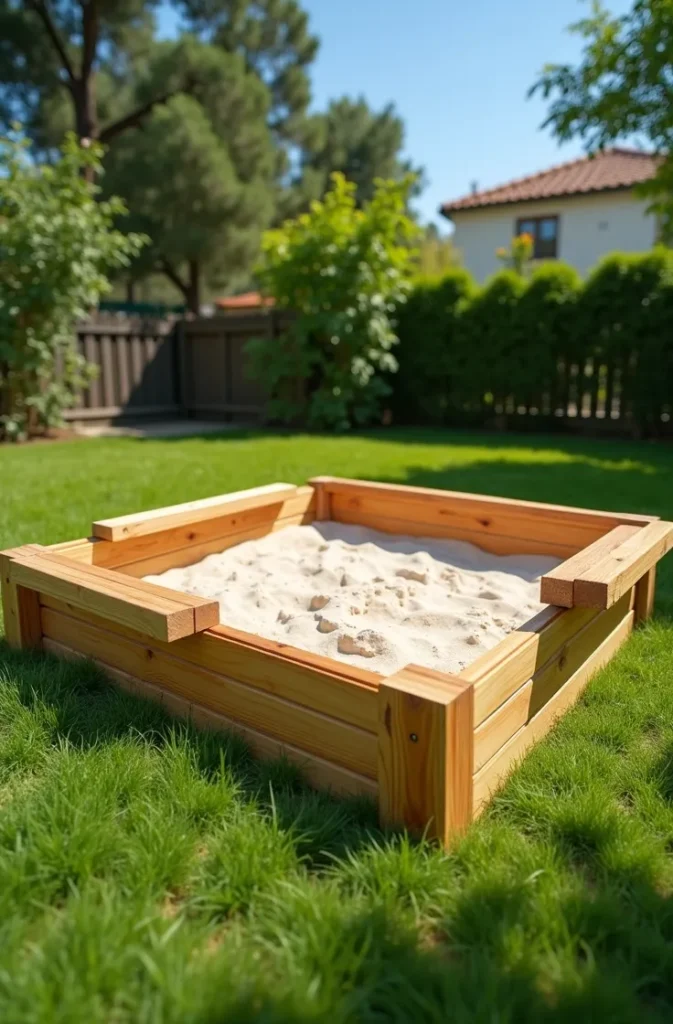

The lid-to-bench conversion works by building the lid in two hinged halves that fold outward and rest on the sandbox frame edges when open. Each half becomes a seat on opposite sides of the sandbox. When play is done, the halves fold closed and latch in the center, keeping sand dry and animals out overnight. This design adds approximately 20 percent more material cost than a lidless frame but extends the usable life of the sandbox significantly.
Build on level ground and cut a weed barrier fabric to fit the interior base before adding sand — but do not use solid plastic sheeting. Solid plastic traps water under the sand and creates anaerobic conditions that breed bacteria. Weed barrier fabric allows drainage while blocking weeds from pushing up through the sand from below.
2. Built-In Corner Sandbox With Landscape Timber Walls for Compact Yards
A corner-mounted sandbox built into the angle of two intersecting fences or garden walls uses space that is otherwise difficult to plant or furnish. The two existing structures become two sides of the sandbox, and only two additional frame walls need to be built. This significantly reduces material cost and construction time compared to a freestanding sandbox.
This approach is one of the most space-efficient backyard sandbox ideas for smaller USA yards — typically under 5,000 square feet — where dedicating a central lawn area to a play structure is not feasible. Tucking the sandbox into a corner removes it from the main circulation and visual center of the yard while keeping it accessible from the lawn.
Use landscape timber or rough-cut cedar in 4-by-4 or 6-by-6 sections stacked two or three courses high for the two built walls. Secure the stacked timbers to each other with rebar pins driven through pre-drilled holes, and anchor the end connections to the existing fence posts with heavy galvanized lag bolts. This creates a rigid structure without requiring concrete footings.
Size the interior to a minimum of 6 by 6 feet in the corner. Smaller than this, the sandbox feels cramped for two children playing side by side and fills with sand-tracked-out waste faster than it should. A 6-by-8 or 8-by-8 corner format gives adequate room for water table toys, digging play, and multiple children without requiring a larger yard footprint.
3. Raised Sandbox on Deck Legs for Toddlers With Ergonomic Standing Play Height
A raised sandbox built at countertop height — typically 24 to 28 inches off the ground — is specifically designed for toddlers between 18 months and 3 years old who engage in sand play best while standing rather than sitting on the ground. At this developmental stage, ground-level sandboxes often result in children sitting in the sand rather than playing in it, which leads to sand being tracked inside more consistently.
The raised format also significantly reduces the animal contamination problem that affects ground-level sandboxes in most USA neighborhoods. Cats and other wildlife cannot easily access a sandbox at standing height, which means the sand stays cleaner between play sessions even without a full cover.
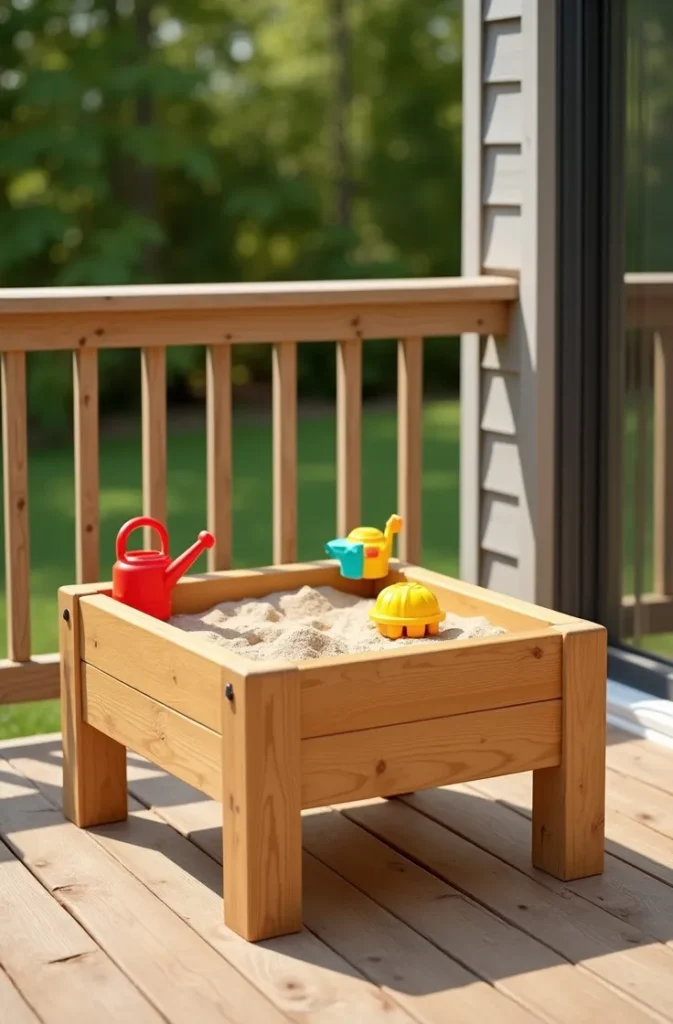
Build the frame from 2-by-6 cedar boards and support it on four 4-by-4 legs cut to a height appropriate for your child’s current standing reach — typically between 22 and 26 inches for children under 3. The box interior depth should be a minimum of 8 inches to allow meaningful digging and sand sculpting without hitting the bottom constantly.
This design works on existing decks as well as lawn settings. When placed on a deck, use a waterproof liner inside the box and ensure the drain hole empties away from the deck surface. Sand and moisture on deck boards over time accelerates rot, so a small drainage tube routed to a bucket or to the yard edge is worth the extra 20 minutes of build time.
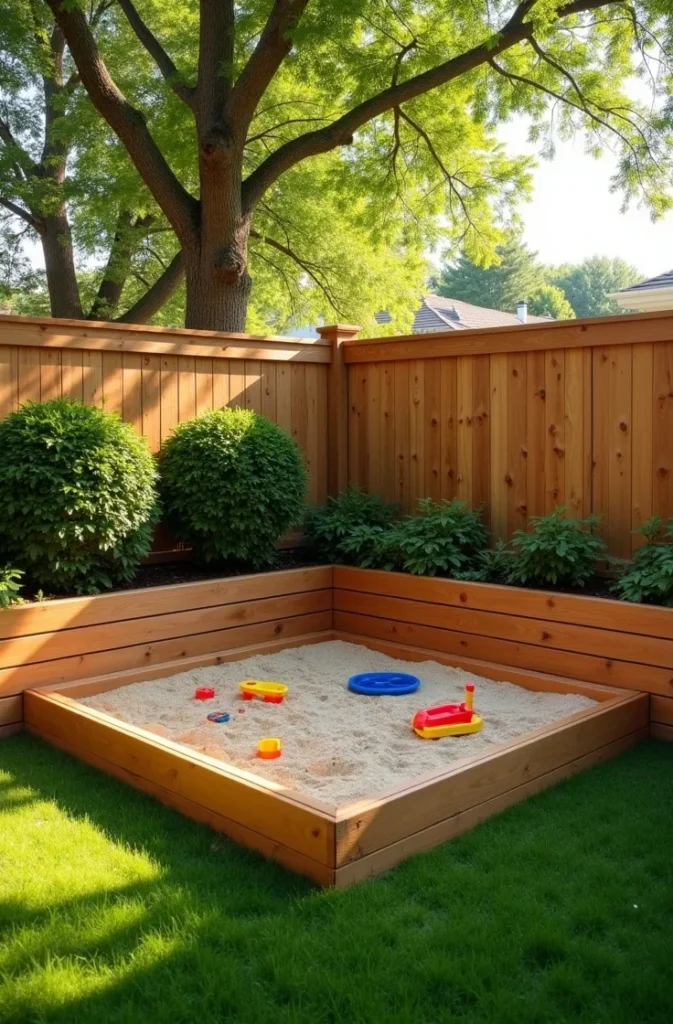
4. Hexagonal Sandbox Frame With Perimeter Seating Ledge for Group Play
A hexagonal sandbox with a 6-inch-wide seating ledge built into the frame perimeter is a step up in design quality from a standard square or rectangular format. The six-sided shape creates a more social play geometry — every child around the perimeter has equal access to the center of the sandbox, and no single position dominates. For families with three or more children or frequent group play, this makes a meaningful functional difference.
The perimeter seating ledge is built by setting the inner sandbox wall lower than the outer frame edge, creating a flat surface wide enough for a child to sit on while reaching into the sand. This eliminates the scrambling-over-the-edge behavior that leads to sand spills and frame damage in standard sandbox designs.

This is a more complex build than a square frame and benefits from a cut list prepared in advance. Each of the six sides requires mitered 30-degree end cuts to close the hexagonal form tightly at corners. Without precise cuts, gaps between frame sections allow sand to escape and create structural weakness at the joints. If using a miter saw for the first time, cut a test piece in scrap lumber before committing to finish cedar.
A hexagonal sandbox with an 8-foot diameter across the widest measurement fits comfortably in most suburban backyard spaces and provides enough interior sand area for four to five children playing simultaneously. This format is one of the strongest current backyard sandbox design trends entering 2026, particularly in USA neighborhoods where outdoor social play among neighborhood children is actively encouraged.
5. Shaded Sandbox Canopy Structure for Hot Climate USA Yards
In USA climates with high summer UV exposure — the southwest, southeast, Texas, and similar regions — an uncovered sandbox is not usable between 10 AM and 4 PM for most of the summer. A built-in shade structure over the sandbox is not an optional upgrade in these climates; it is a functional necessity that determines whether the sandbox gets used at all through peak outdoor season.
The most practical shading system for a home-built backyard sandbox is a four-post timber frame with a stretched shade sail canopy. Four 4-by-4 posts set into ground anchors at the four corners of the sandbox at a height of 7 to 8 feet, with a shade sail tensioned between them, provides 90 percent UV reduction across the entire sandbox footprint without blocking airflow or creating an enclosed feeling.
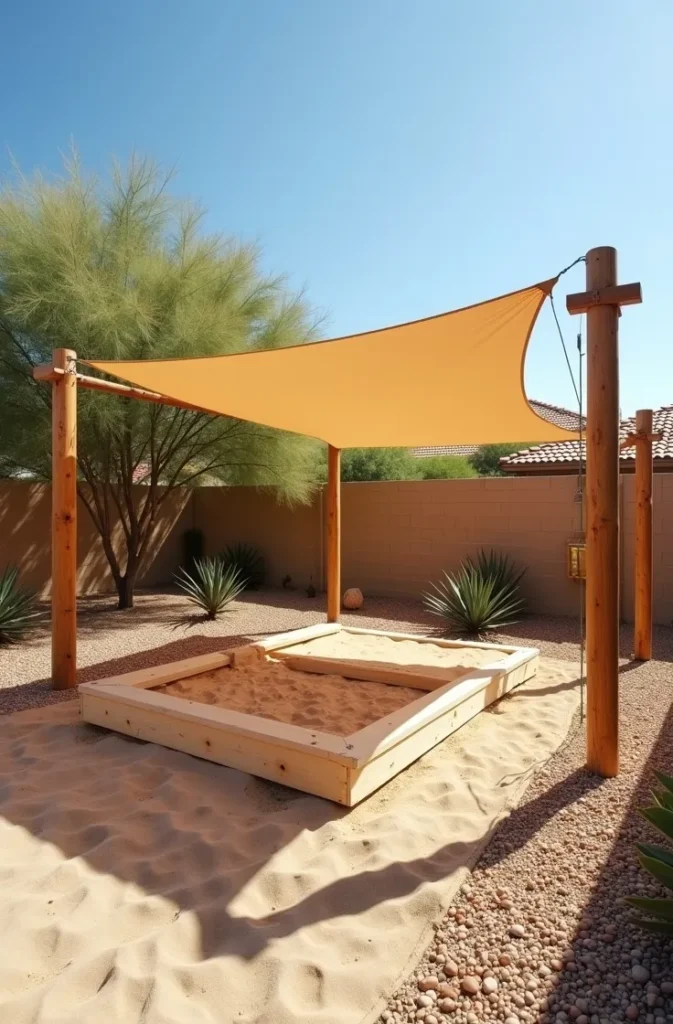
Choose a shade sail rated for UV reduction specifically, not a decorative outdoor canopy. UV-blocking shade sails are rated by the percentage of UV they block — look for 90 percent or above for adequate protection in southern USA states. Decorative canopy fabrics do not carry UV ratings and provide minimal actual sun protection despite blocking visible light.
Orient the shade structure so the lowest point of the sail is on the south side, where direct sun enters at the highest angle. This keeps the shade coverage consistent across the day without requiring adjustment. A shade sail that is flat or incorrectly angled will provide full shade for two hours and no shade for the rest of the day — a common error in first-time shade sail installations.
6. Sandbox Integrated Into a Wider Play Zone With Defined Material Transitions
A sandbox that exists as one element within a designed outdoor play zone — rather than as a standalone object dropped in the lawn — reads as a planned space rather than an afterthought. The integration involves defining material transitions between the sandbox and adjacent play surfaces using clear, durable borders.
The play zone layout that works best for most USA suburban backyards positions the sandbox at one end of a defined rectangular play area, with rubber mulch or engineered wood fiber ground cover filling the rest of the play zone under any climbing or swing equipment. A landscape timber or steel garden edging border separates the sand from the rubber mulch and prevents migration between materials. Without a defined border, sand and rubber mulch mix within one play season and the visual clarity of the design collapses.

This kind of integrated backyard children’s play space planning is increasingly popular in USA residential design because it concentrates child-specific elements into one zone and leaves the rest of the yard available for adult use, gardening, or lawn space. The play zone becomes its own room within the larger yard, which works well for yards of 2,000 square feet or more.
The sandbox in an integrated play zone should be sized proportionally to the whole area — typically 25 to 30 percent of the total play zone footprint. A sandbox that is too large relative to the surrounding play area dominates the zone visually and functionally. A sandbox that is too small looks underscaled and often goes unused because it feels too cramped relative to the more active play equipment nearby.
7. Naturally Landscaped Sandbox With Planted Timber Surround for a Garden-Integrated Look
A sandbox surrounded by low planted borders, ornamental grasses, or ground cover plants transitions the structure from a utilitarian play object into an intentional landscape element. This is particularly valuable for front-facing yard areas or for gardeners who have invested in landscape aesthetics that a basic sandbox box would visually undermine.
Build the sandbox frame from landscape timbers or rough-hewn cedar logs with a slightly irregular, natural appearance rather than smooth-planed lumber. Then plant the outer perimeter of the frame with low ornamental grasses, creeping thyme, or low lavender — plants that soften the timber edge and create a visual buffer between the sandbox and the surrounding lawn or garden bed.
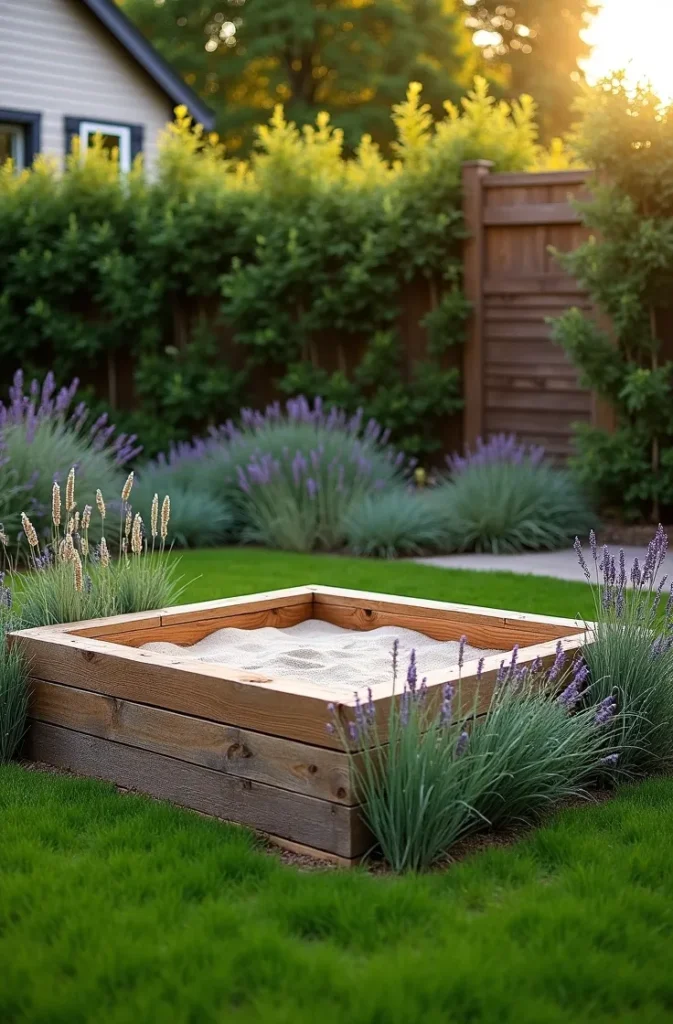
The planting perimeter needs to be set at least 18 inches away from the sandbox frame edge to prevent roots from migrating into the sand and to allow children to move around the sandbox perimeter without stepping through plantings. A mown grass strip or a simple gravel buffer between the planting and the sandbox frame is the most practical solution.
This design works best in yards where aesthetic cohesion with existing garden landscaping is a priority over purely functional sandbox placement. It is more construction and planting work than a basic frame build but produces a sandbox that fits the landscape rather than interrupting it. For USA gardeners who have invested significantly in their yard design, this integrated approach protects that investment while adding play functionality.
8. Foldable Sandbox Frame for Rental Properties or Temporary Backyard Setups
A collapsible sandbox — built from bolted timber sections that disassemble and store flat — solves the specific problem faced by renters and families who move frequently. Building a permanent sandbox in a rental property represents a loss on investment when the lease ends and the structure cannot be taken. A designed-to-disassemble sandbox travels with the family from yard to yard.
The construction uses four or eight individual frame boards with threaded bolt connections at each corner rather than screwed or nailed joints. Each corner uses a carriage bolt, washer, and wing nut that can be tightened by hand — no tools required for assembly or breakdown. The fully disassembled frame stacks flat in a garage corner or storage unit at a height of about 8 inches for a standard four-board design.
The limitation of this approach is structural: a bolted frame is not as rigid as a screwed or nailed construction, which means the frame will flex slightly at the corners during active play. Staying below 6-by-6 feet in interior dimension helps — larger foldable frames flex too much and the corners can pull apart under sustained load. For families needing a larger sandbox, a standard permanent build is the more appropriate choice.
This design also suits seasonal use in USA climates where the sandbox is only usable for five to six months of the year. Rather than leaving a permanent structure in the yard through winter, a collapsible frame stores inside and returns to the yard each spring, extending the usable life of the frame by protecting it from freeze-thaw cycles and off-season moisture.
9. Covered Sandbox Tunnel and Play Structure Combination for Active Backyard Play
A sandbox integrated beneath or adjacent to a low timber play structure — a simple platform, tunnel, or covered fort — adds an imaginative play layer that keeps children engaged with the sandbox space beyond toddler age. Most standalone sandboxes lose regular use by age 5 to 6; a sandbox connected to a play structure that includes crawl-through or above-ground elements extends active use through age 8 or 9 in most cases.
The simplest integration is a low platform deck built directly adjacent to the sandbox at sandbox-frame height, connected by a short bridge section. Children move between the platform and sandbox during play, using the platform as a staging area, a shop counter in imaginative play, or simply a dry seat between digging sessions. The platform also serves as adult seating when supervising play.
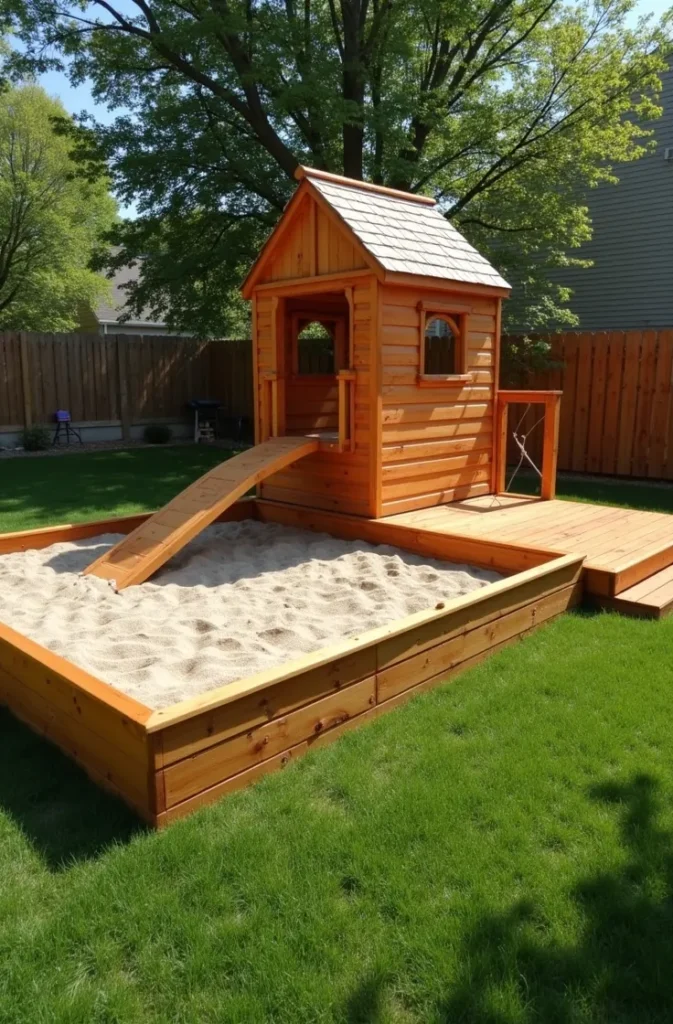
Build the platform and sandbox from matching cedar for visual cohesion. The two structures should read as one designed unit rather than two separate objects placed next to each other. A shared color stain applied to both after construction is the simplest way to achieve this if the build takes place in separate stages.
This combination works best in yards with a minimum of 12 by 12 feet of available play area. Below that footprint, the combined structure feels crowded and limits the play circulation between elements. For smaller yard sandbox planning, a standalone sandbox without the attached platform is the more practical and proportional choice.
10. Decorative Rock and Timber Edge Sandbox for a Landscaped Backyard Focal Point
A sandbox edged with natural fieldstone or river rock rather than milled lumber creates a landscape focal point that reads as an intentional design element rather than a children’s play accessory. The natural stone edging connects the sandbox visually to the broader landscape language of a garden — particularly in yards that already use stone for pathways, retaining walls, or water features.
The construction method differs from a lumber-frame build. Fieldstones or large river rocks are set partially into the ground around the perimeter of the excavated sandbox area, leaning slightly inward. No mortar is required — the stones are held in position by their own weight and the pressure of the compacted surrounding soil. The sand is then added to the interior, which locks the base course of stones firmly in position.
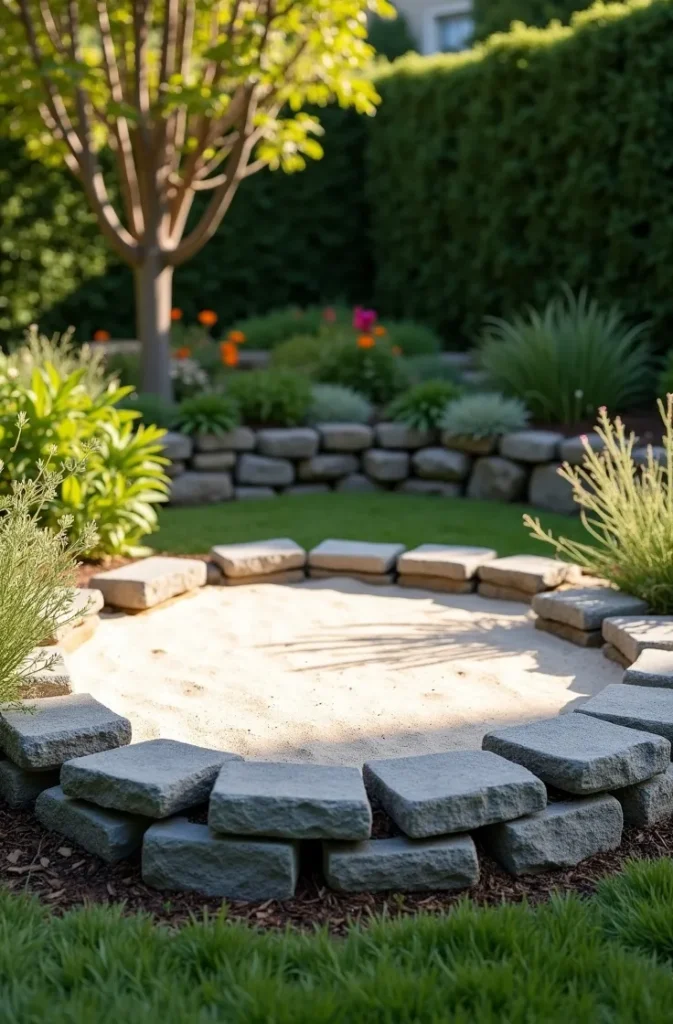
Stone edging must be set at a minimum of one course below the sand surface level. If stones protrude above the sand level, they become trip and fall hazards when children step in and out of the sandbox. Set stones so their top surface is flush with or just slightly above the surrounding lawn level, with the interior sand sitting at the same height.
This design is most appropriate in yards with a naturalistic, cottage, or craftsman landscape character — settings where the irregular surface of fieldstone belongs. In very modern or minimalist yards, natural stone sandbox edging creates an aesthetic tension with the clean lines of the surrounding design. Match the sandbox border material to the existing hardscape and landscape materials in your specific yard for the most cohesive result.
Plan It Once, Build It Right
The sandbox ideas in this list cover the full range of USA backyard situations — from compact rental yards to large suburban play zones, from toddler-specific raised builds to multi-age integrated structures. The right choice depends on three factors you know before anyone else does: the size of your available space, the age range of the children who will use it, and how long you plan to stay in the property.
Save this post before you start buying materials — the build decision you make in the first hour determines everything that follows. Return to it when you are standing in your yard with a measuring tape, and the right option will be considerably easier to identify.
For more backyard family space planning, explore related content on residential play zone layouts, outdoor children’s garden design, and small yard functional landscaping ideas for 2026.